Writing a book can be a parlous activity: alone on uncharted waters, trying to ignore self-doubt, discovering that what you thought you knew when you began to write has evaporated like the morning fog, it's easy to begin thinking about giving it all up. And when you actually have the book in hand, the silence is all but deafening. You ask yourself, Was it really worth it? That's when a positive review can lift your spirits.
Here is the link to one by Steve Bodio (who also wrote a blurb for the book) on his blog Querencia: http://stephenbodio.blogspot.com, November 23, 2014.
And here is the link to the ones on Amazon, so far all five star reviews:
http://www.amazon.com/Blood-My-Hands-Question-Relationship/dp/1457522322/ref=sr_1_2?ie=UTF8&qid=1416947408&sr=8-2&keywords=blood+on+my+hands#customerReviews
Hits and Misses

Tuesday, November 25, 2014
Monday, November 24, 2014
Remodeling a BRNO Mauser, Part 6
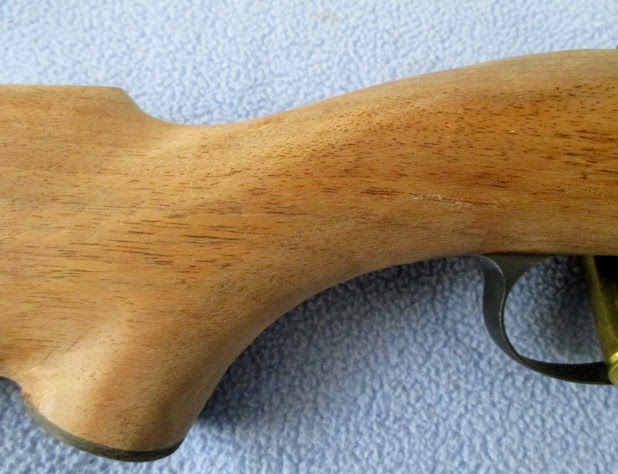
I've made some progress since my last post. I've swapped out the military two stage trigger for a Timney, which necessitated some inletting for the larger trigger mechanism. I have added a Talley barrel band for a sling swivel. I happily paid $15 to get it professionally blued (it was sent as part of a batch from a local gunsmith and was back in a week), so it's a much better match with the bluing on the barrel than a cold blued band would be.

I've also substituted an "Extended Floorplate Release" for the military one. It's available from Midway. This is simple to do: just drive out the pin visible below in the upper left corner. There's a spring in there, so guard against its flying across the shop. I had to file a bit to get the release to fit properly. If you also cut a coil off the release spring, it makes it easier to release or replace the floorplate.

Stockwork: First came sanding and whiskering (wetting the wood with hot water to raise the grain, drying it, then sanding the whiskers off against the grain) through 320 grit. I used sanding blocks whenever possible. The difference between a first-class finishing job and a sloppy one lies in the sanding. Then came dyeing with a 2-2-1 mixture of dark walnut, red mahogany, and antique cherry dyes. (Let me emphasize the use of dyes, not stains which obscure the grain; they can be purchased at any decent woodworking supply house in powdered form, which you mix with water. One source is Woodcraft.) Try to be pleased when that first application of dye reveals blemishes you hadn't noticed. After all, it's better to see them now rather than later. Sand and whisker again, and then dye once more. Repeat as necessary.
Given that the dye is water based, this may mean that you will have to do a final whiskering after dyeing the stock--I typically cut the whiskers off with the next finer grade of sandpaper, which in this case was 400 grit, going against the grain. If you're going to checker the stock, make sure you've saved some of the dye to color the checkering. I then applied two coats of alkanet oil (if you want to make your own, see my post alkanet oil). The alkanet oil should be applied sparingly, well rubbed in, and let dry for several days. It's additive, so if you want it a bit darker, add another coat. Make sure that no surplus remains on the surface of the stock.
Filling the Pores and Finishing: When I can no longer smell the alkanet oil on the wood, the stock is ready for finishing. I first applied two coats of marine spar varnish as a sealer (not that wood can ever be thoroughly sealed). The first coat was thinned with mineral spirits. Then I rubbed down lightly with 0000 steel wool. Any hardware store will have some, but I prefer the extra fine oil-free steel wool sold by Lee Valley. If the wood has really large pores, you may want to use a filler. I've used Herter's French Red filler in the past, and it works. Now, unless the pores are crater-like, I fill the pores by sanding in the finish.
I have tried a variety of finishes and have settled on TruOil. As with any finish, apply thin coats. I applied two coats of TruOil and then sanded in the third. Typically, I use 320 or 400 grit. I wet a small portion of the stock with TruOil and then rubbed the sandpaper gently with the grain until the finish was almost dry. Then, on to the next area. A day later, I rubbed down the stock with 0000 steel wool. I got rid of the steel wool particles by burning them off over my kitchen's gas stove (I have, fortunately, an understanding wife). The pores were shallower but still visible, so I built up two more coats of TruOil and sanded in the following coat. That filled the pores. Another rubdown with 0000 steel wool and another coat of TruOil resulted in a finish you could see your face in.
I personally don't care for that high gloss, so I rubbed down the finish. Tradition calls for using pumice or rottenstone, but I've found that auto rubbing compound works well and is cheap and readily available. Just follow the directions, and as ever, use a light touch. (If that finish isn't shiny enough for your taste, rub it down with--ready for this?--auto polishing compound.) Wipe it down carefully and let it sit overnight.

At this point, either I apply two thin coats of furniture wax and buff it by hand, or a coat of alkanet oil, well rubbed in with the palm of your hand.
The next post will deal with ways I've found to make checkering less error-prone.
Thursday, November 6, 2014

Saturday, November 1, 2014
The Lure of the Falcon, by Gerald Summers
The Lure of the Falcon (Simon and Schuster, 1972) is a memoir in which Gerald Summers moves from his love for nature as a boy in pre-World War II England to an account of his experiences in battle in North Africa, his being wounded and captured by the Germans, flown to a POW camp in Sicily, his escape with four others and their recapture, and then his subsequent experiences in other Italian and then German POW camps until he is liberated by the Americans.
Such a bald account does little to describe what can only be called an extraordinary book. In the first place, it is imbued with a love for nature. Although he never mentions the guidebooks he must have begun memorizing as a boy, he apparently could instantly identify any moth, bird, or butterfly that crossed his path. And many of these he brought home with him. He also acquires an wonderful bitch, Bracken, that goes with him everywhere and eventually finds the injured female kestrel he nurses back to health and names Cressida.
So far, this is the sort of book someone like Gerald Durrell could have written. What makes The Lure of the Falcon unique is that Summers enlists in the British Army's Sherwood Foresters, the 4th Regiment of Foot, and calmly takes both Bracken and Cressida with him to basic training. He then leaves Bracken with his mother, but he stuffs Cressida in his battle jacket and off they go to war. Cressida becomes a kind of talisman, in fact, for the Foresters.
And there are indeed grounds for thinking that Cressida brings him luck. Wounded in a German assault first by a bullet and then by the explosion of a rifle grenade, he is captured and forced to remove his jacket so his multiple wounds can be attended to. And there, "with her great lambent eyes scrutinizing the foe, sat Cressida." Summers fully expects Nemesis to strike, but the German medical officer is staring at Cressida with an expression of rapture. At last he breaks the complete silence, "Ah," says he, "ein Turmfalke," and all the Germans immediately relax. It turns out that the German doctor had been a practicing falconer, and he even pulls out a photo of his goshawk to prove it. And when Summers is shipped out, the MO brings him a tin with three mice in it so he can feed Cressida en route.
On another occasion, following his recapture in Sicily after an escape attempt, he is thrust at bayonet point into an interrogation with an officer of the Gestapo. His interrogator stops barking questions at him when he spots a suspicious bulge in Summers' jacket. He grabs Summers and thrusts his hand into his jacket, presumably thinking he will find a pocket radio. The Gestapo officer yelps and quickly withdraws his hand, dripping with blood. Summers then pulls Cressida out of his jacket: she is mantling, her eyes glowing like red coals. The Gestapo officer retreats. Nobody says a word, but when Summers dares to look at the other Germans, all of them are trying to suppress their laughter.
Summers has to endure much as a POW, but he does endure. After Cressida and he finally are liberated by the American troops, he can keep the promise he made to her when they embarked for North Africa: he brings her safely home, back to a reunion with Bracken and his mother. Such an ending could easily be sentimental, but Summers's understated prose instead makes us rejoice with him at their newfound freedom.
Tuesday, October 28, 2014
Wiliam Alexander's 52 Loaves
The subtitle of 52 Loaves (Algonquin Books of Chapel Hill, 2010) conveys in a suitably ironic way what Alexander's book is about: One Man's Relentless Pursuit of Truth, Meaning, and the Perfect Crust. Obsessed by memories of a peasant loaf, Alexander decides to bake one loaf of bread a week for a year, fifty two loaves, obviously, so that he can replicate that perfect loaf of bread.
Critiquing his efforts are his wife and his two teenagers, and they provide a skeptical and sometimes comic commentary on his efforts. He seeks out professional help, and he even builds a wood-fired oven in his backyard, or, rather, he builds two, for the first one collapses. He takes a bread-baking course at The Ritz in Paris, one that emphasizes quantity over quality. And then, by a process that I don't want to spoil by revealing, he finds himself a special guest of an ancient abbey in Normandy, l'Abbaye Saint-Wandrille de Fontenelle, engaged to teach two of the monks how to bake their daily bread.
This monastic experience not only gives him the organizing principle for 52 Loaves, a division by the canonical hours of Vigils, Lauds, Terce, etc., but makes him reconsider his entire concept of spirituality. Even though he can't understand the Latin of the Gregorian chants, they begin to work on him in unexpected ways. For a week, he too is in the world but not of it.
My only criticism of 52 Loaves is that Alexander is not forthcoming about what his experiences in the abbey really amount to. He admits to a problem of re-entry when he returns to his home in the Hudson River valley, but he doesn't want to tell his family about it, and unfortunately we don't learn much about it either. Like the subtitle's juxtaposition of the pursuit of truth and meaning with the perfect crust, we are forced to lower our expectations: we are told in detail not what he took away with him from the abbey but how after his return he ruined their kitchen oven, and then ruined its replacement as well. The reader must rest content with his recipes.
Postscript: for other books on bread and bread making, see my earlier post, "Homemade Bread to Die For, Part 5 (2/28/2014).
Tuesday, October 14, 2014
Duly Noted: What and How Deer See
"Duly Noted" refers to material by others that I believe to be interesting. In the current issue of Petersen's Hunting (Nov. 2014), Ben O'Brien discusses the result of a recent study of whitetail deer by Dr. Bradley Cohen and his colleagues at the Warnell School of Forestry and Natural Resources, Univ. of Georgia, and Dr. Cohen's responses to interview questions.
It turns out that deer not only see somewhat differently than humans, but don't see as well, either. If you squint and keep on squinting, you're replicating to some degree how a deer sees: everything is blurry and in the same focus.
Within this blurry focus, however, some colors are better perceived than others. Blue, violet, and near ultraviolet light are seen more clearly by deer than other colors. Near sunrise and sunset, blue and UV makes up much of the light available, and that's what deer see better than other colors. So keep those jeans at home, boy.
And camo? Apparently, depth in camo patterns isn't important, but the gray parts in camo reflect blue or UV light. Just what a hunter wants, right? A camo that, far from disguising human presence, makes him or her more visible during the so-called "best" times to hunt, early and late! Their study reinforces what has become quite well known: don't wash hunting clothes in detergents with brightening agents, which absorb light in the UV region of the color spectrum and re-emit light in the blue region.
Dr. Cohen's study appeared in the Wildlife Society Bulletin, May 2014; an abstract can be found at http://onlinelibrary.wiley.com/doi/10.1002/wsb.438/abstract.
Saturday, October 11, 2014
Remodeling a BRNO Mauser sporter, Part 5
Epoxy bedding is straightforward enough, but the devil lies in the details. There are a number of explanations about how to do this: three I especially like are "Simple Stock Bedding" by John Barsness in his Obsessions of a Rifle Loony (Deep Creek Press, 2010), a book every firearms enthusiast should own, Patrick Sweeney's "Glass Bedding" in his excellent Gunsmithing Rifles (Krause Publications, 1999), and "The Experience of Glass Bedding a Rifle Stock" by Bryce Towsley in his Gunsmithing Made Easy (Stoeger Publishing, 2006), which has detailed photographs.
The key point to remember is that if you don't apply release agent to every part that needs it, you can glue the stock to the barreled action. Some people like to use floor or furniture wax as a release agent. I prefer some combination of three release agents: Brownell's Acra-Release Aerosol; modeling clay to fill screw holes and crevices where you don't want epoxy; and Pasco PVC 10 mil Pipe Wrap for masking off the barrel.
I use Brownell's Acraglas Gel rather than Acraglas, as it pretty much stays put where you apply it.
Some other suggestions: Score or crosshatch the wood with a sharp knife or chisel so the epoxy adheres.
Don't forget to put release agent on the action screws, as well. Forster stockmaker's handscrews are useful here.
Q-tips are good place holders for the receiver screws on a bolt action. For Mausers, which have the front screw going into the recoil lug, you can put a Q-tip in the recoil lug, lower the receiver into the epoxy on the stock, and then pull the Q-tip out of the bottom metal.
To facilitate getting the barreled action out of the stock, you don't want epoxy in front of the recoil lug, so put release agent on the front of the lug.
I follow the practice recommended by John Barsness for bedding Mausers, which have a narrow recoil lug: I bed the first inch of the barrel as well, so I keep the Pipe Wrap off the first inch of the barrel and spray receiver and that inch of barrel with release aerosol (twice).
If you need to fill gaps along the receiver or the barrel in the fore end, put masking tape along the top of the stock so you can peel it off after it cures.
Tighten the screws only moderately: I tighten them and then back them off half a turn.
Check the epoxy after five hours. After five hours, the epoxy has set up enough to be semi-solid, but it's yielding enough to be pulled apart if you've made a mistake. If some has gone where it shouldn't, you can still cut it easily with a knife or chisel and remove it. Then screw it back together, back off the screws a half turn, and let it set.
To remove the barreled action from the stock, turn the rifle upside down and tap the heel of the butt on a surface that won't harm the stock. You should then be able to remove the barreled action. Repeat, more firmly, as necessary. If it still won't budge, back out the screws until they are just engaged and hit them with a mallet. If that doesn't work, call Brownell's (641 623-5401).
You may discover some voids in the bedding. Here, for example, is the BRNO after the first bedding:
 Some gaps in the bedding are obvious. Not to worry: just mix up some more epoxy and fill in the gaps. Wipe down the metal and reapply release agent, etc.
Here's how it looked after another application:

The key point to remember is that if you don't apply release agent to every part that needs it, you can glue the stock to the barreled action. Some people like to use floor or furniture wax as a release agent. I prefer some combination of three release agents: Brownell's Acra-Release Aerosol; modeling clay to fill screw holes and crevices where you don't want epoxy; and Pasco PVC 10 mil Pipe Wrap for masking off the barrel.
I use Brownell's Acraglas Gel rather than Acraglas, as it pretty much stays put where you apply it.
Some other suggestions: Score or crosshatch the wood with a sharp knife or chisel so the epoxy adheres.
Don't forget to put release agent on the action screws, as well. Forster stockmaker's handscrews are useful here.
Q-tips are good place holders for the receiver screws on a bolt action. For Mausers, which have the front screw going into the recoil lug, you can put a Q-tip in the recoil lug, lower the receiver into the epoxy on the stock, and then pull the Q-tip out of the bottom metal.
To facilitate getting the barreled action out of the stock, you don't want epoxy in front of the recoil lug, so put release agent on the front of the lug.
I follow the practice recommended by John Barsness for bedding Mausers, which have a narrow recoil lug: I bed the first inch of the barrel as well, so I keep the Pipe Wrap off the first inch of the barrel and spray receiver and that inch of barrel with release aerosol (twice).
If you need to fill gaps along the receiver or the barrel in the fore end, put masking tape along the top of the stock so you can peel it off after it cures.
Tighten the screws only moderately: I tighten them and then back them off half a turn.
Check the epoxy after five hours. After five hours, the epoxy has set up enough to be semi-solid, but it's yielding enough to be pulled apart if you've made a mistake. If some has gone where it shouldn't, you can still cut it easily with a knife or chisel and remove it. Then screw it back together, back off the screws a half turn, and let it set.
To remove the barreled action from the stock, turn the rifle upside down and tap the heel of the butt on a surface that won't harm the stock. You should then be able to remove the barreled action. Repeat, more firmly, as necessary. If it still won't budge, back out the screws until they are just engaged and hit them with a mallet. If that doesn't work, call Brownell's (641 623-5401).
You may discover some voids in the bedding. Here, for example, is the BRNO after the first bedding:
Here's how it looked after another application:
A tiny bit has to be added to smooth out the bedding for the barrel, but it's functionally complete.
The next in this series will cover finishing the stock.
Monday, October 6, 2014
Remodeling a BRNO Mauser Sporter, Part 4
Now comes the patient, painstaking part: the drama of cutting off big chunks of wood is over. At this point, it helps to make a check list for the sequence you need to follow. For example, I am going to add a barrel band for a sling swivel, so I don't want to attach the front sight before I do that. (You ask, why do I mention something so obvious? Never mind!)
To make matters even less dramatic, much of the work that needs to be done will not be visible, as in floating the barrel or supporting the recoil lug with epoxy. I can promise, however, that following all these steps does eventually result in a real sense of satisfaction and, sometimes, a year or so later, a sense of wonder: "I did that? It looks pretty good!"
For now, let's begin with the two tasks I mentioned in my last post: filing down the tang of the receiver and rounding the squared-off fore end. Each one affects how the rifle will look. Here's a picture of the Mauser tang in a military stock:

Notice the wood chipped out behind the tang? That's why you don't want to copy this configuration in a Mauser sporter: working the bolt will chip out some wood. The solution is simple: just file metal and wood together until the rear of the channel barely protrudes above the tang and stock. Here's how the BRNO came out (later, I'll cold blue the tang):

So, no fore end tip. That's OK: As the great stock maker Alvin Linden commented, fore end tips don't do anything! For a classic look, the tip of the fore end should be rounded. Here, it helps to have the depth of the fore end pretty close to its width. One method of making it round is shown on Midway's video. I just eyeball it and take my time. If it seems off, just measure the depth (or width), divide that in two for a radius, and then scribe half a circle on a piece of paper, cut it out, and hold it against the wood. It will be immediately obvious where it's off. Restrain yourself from making it perfect, for fine sanding will come later, and that can easily distort curves and, especially, complex curves.

In the next post, I'll talk about epoxy bedding the action. Whoever inlet this rifle did an excellent job, apparently using a very small gouge. But the epoxy, carefully applied, will produce an even better job where it counts most, around the recoil lug.
To make matters even less dramatic, much of the work that needs to be done will not be visible, as in floating the barrel or supporting the recoil lug with epoxy. I can promise, however, that following all these steps does eventually result in a real sense of satisfaction and, sometimes, a year or so later, a sense of wonder: "I did that? It looks pretty good!"
For now, let's begin with the two tasks I mentioned in my last post: filing down the tang of the receiver and rounding the squared-off fore end. Each one affects how the rifle will look. Here's a picture of the Mauser tang in a military stock:
Notice the wood chipped out behind the tang? That's why you don't want to copy this configuration in a Mauser sporter: working the bolt will chip out some wood. The solution is simple: just file metal and wood together until the rear of the channel barely protrudes above the tang and stock. Here's how the BRNO came out (later, I'll cold blue the tang):
Not only will you not have a problem with wood chipping out, but you will gain a better line for the top of the pistol grip. Now its slope looks less like a ski jump: the top line is more gradual and more graceful:
You have two choices in regard to the squared-off fore end. One is to add an ebony tip; the other is simply to round it off. I like ebony tips, but this barrel is only 21 1/2" long, so space is tight. To have the fore end in proportion to the length of the barrel, I need to have a barrel band for the sling swivel. That in itself doesn't preclude an ebony tip, but I have long arms (a 35" sleeve), so my forward hand will have to be very close to the end of the stock. Given that I want some checkering where my hand goes, there simply isn't room for a fore end tip.
So, no fore end tip. That's OK: As the great stock maker Alvin Linden commented, fore end tips don't do anything! For a classic look, the tip of the fore end should be rounded. Here, it helps to have the depth of the fore end pretty close to its width. One method of making it round is shown on Midway's video. I just eyeball it and take my time. If it seems off, just measure the depth (or width), divide that in two for a radius, and then scribe half a circle on a piece of paper, cut it out, and hold it against the wood. It will be immediately obvious where it's off. Restrain yourself from making it perfect, for fine sanding will come later, and that can easily distort curves and, especially, complex curves.
In the next post, I'll talk about epoxy bedding the action. Whoever inlet this rifle did an excellent job, apparently using a very small gouge. But the epoxy, carefully applied, will produce an even better job where it counts most, around the recoil lug.
Saturday, October 4, 2014
Moose + Car Photo
Having driven through Moose Pass twice in our trip to Alaska and, in addition, having seen many, many yellow highway signs warning drivers to watch out for moose, I was impressed by this photo included in the current newsletter of Cornell Publications (not to be confused with the university or college by that name, but a catalog reprinting business owned by Rob and Abby Mouat: http://www.cornellpubs.com/. They provide a wonderful service at a very reasonable cost).
A moose has such long legs that when it's hit by a car, the body comes through the windshield, typically killing the driver. In this case, the driver was apparently born under a lucky star.

A moose has such long legs that when it's hit by a car, the body comes through the windshield, typically killing the driver. In this case, the driver was apparently born under a lucky star.
The lady driving the car apparently walked away with minor injuries!
thanks to Dick Carleton
Tuesday, September 30, 2014
Ted Kerasote's Pukka's Promise
In Pukka's Promise: The Quest for Longer-Lived Dogs (Houghton Mifflin Harcourt, 2013), Ted Kerasote provides a far-ranging investigation of what we know about canine breeding, nutrition, vaccination, sterilization, and life span. Woven through this hefty book of 452 pages are accounts of his finding a Lab puppy which he names Pukka (pronounced Puck'a, from the Hindi for First Class) and the methods he used to train him as the other member of his household.
Anyone with a dog or contemplating getting a dog will find much of interest here. Kerasote explodes the practice of annual vaccinations, provides alarming information about feeding kibble, and reveals that vets continue to spay and neuter--instead of doing tubal ligations and vasectomies--because those are the operations they were taught to do in vet school. And he obligingly provides notes so that his readers can follow up and come to their own conclusions.
The one drawback to this informative book concerns Kerasote's conversations with Pukka. Show me someone who doesn't talk to her or his dog, and I'll show you a dreary person indeed. The problem is that Kerasote also supplies Pukka's half of the conversations, and I find this truly cringe-inducing. Given that one side of these verbal exchanges is fictional, the old advice for fiction writers remains valid here: show, don't tell.
That aside, Ted Kerasote's Pukka's Promise is well researched, engagingly written, and thought-provoking.
Wednesday, September 24, 2014
Blood on My Hands now available on Kindle
I'm happy to announce that Blood on My Hands is now out as an e-book. The price of the Kindle edition on Amazon is $9.99. (If anyone knows why it takes so long to produce an electronic text from a printed one, I'd like to hear about it.)
Friday, September 19, 2014
Remodeling a BRNO Mauser Sporter, Part 3
When I wasn't staggering through the taiga or the tundra in our recent trip to Alaska, I found myself happily contemplating how this remodeled BRNO sporter in 7x57mm should look. I wasn't sure that removing the last vestige of the Monte Carlo comb was going to leave me with enough comb height to use a scope, so I decided to make a defect a virtue and set up the rifle with a Lyman peep sight (it was already drilled and tapped for one). I'd have to shop for another ramped front sight, one long enough to use or to hide the existing two blind screws.
I ordered a 1" red pad from Galazan, knowing from experience that it was easy to sand to fit. I forgot, though, that it comes without screws (why, I don't know), but I managed to turn up two that would work. Attaching the pad was relatively straightforward. As the outer surface of the pad was not cut for the screws, I inserted them from the rear and pressed the pad with the inverted screws down on my bench. With a sharp knife, I made two small slits where the points stressed the material. Some Vaseline on the screws, and they entered the pad fairly easily. I used the original hole for the top screw, but the lower one did not line up (it almost never does). Not a problem: I glued in my favorite tapered dowel, a chopstick, and then cut it flush when the glue had dried. Then, after carefully positioning the pad on the stock, engaging the top screw, and inserting the bottom screw in its place, I tapped it to mark its position. For this kind of drilling, I much prefer an eggbeater hand drill: it's a bit slower, so I have more time to correct before something goes really wrong.
I worked down the pad to fit by using a hacksaw to saw off excess, then, carefully, a belt sander, and finished up with sandpaper on a block. For reasons I'm not clear about, 220 grade cuts the pad more cleanly than 100 grade.
Once the pad was in place, I could adjust the angle of the grip cap. I didn't need any more length for the pistol grip, so I set the bottom angle so that extending that line would hit the top of the recoil pad, as in the illustration I used in Part 2:

Here's the shaped and rough-sanded ebony cap; I'll thin it a bit later:

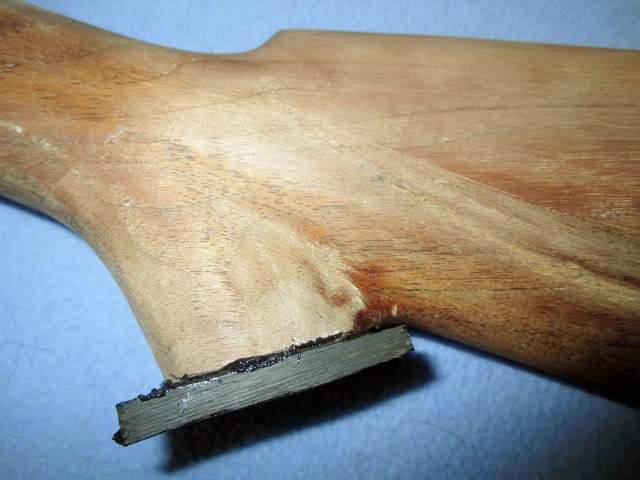
Two other operations had to take place: first, cutting the fore end to length; second, filling in the gap in front of the bottom metal, caused by substituting a FN commercial one I had on hand for the military one. I like a miter box for cutting the fore end at ninety degrees, and I use tape on the underside to keep splintering to a minimum.
Here's a photo showing the differences in length between the military and commercial versions of the bottom metal. Using the shorter one without guard screws of course leaves a gap in the inletting, so I patched it with a piece of the cut-off fore end. The patch itself is completely obscured, what with the rubber band putting pressure on the patch in one dimension and the bar clamp putting pressure on it in another dimension; the other end of the bar clamp is on the now flat surface of the fore end.


I ordered a 1" red pad from Galazan, knowing from experience that it was easy to sand to fit. I forgot, though, that it comes without screws (why, I don't know), but I managed to turn up two that would work. Attaching the pad was relatively straightforward. As the outer surface of the pad was not cut for the screws, I inserted them from the rear and pressed the pad with the inverted screws down on my bench. With a sharp knife, I made two small slits where the points stressed the material. Some Vaseline on the screws, and they entered the pad fairly easily. I used the original hole for the top screw, but the lower one did not line up (it almost never does). Not a problem: I glued in my favorite tapered dowel, a chopstick, and then cut it flush when the glue had dried. Then, after carefully positioning the pad on the stock, engaging the top screw, and inserting the bottom screw in its place, I tapped it to mark its position. For this kind of drilling, I much prefer an eggbeater hand drill: it's a bit slower, so I have more time to correct before something goes really wrong.
I worked down the pad to fit by using a hacksaw to saw off excess, then, carefully, a belt sander, and finished up with sandpaper on a block. For reasons I'm not clear about, 220 grade cuts the pad more cleanly than 100 grade.
Once the pad was in place, I could adjust the angle of the grip cap. I didn't need any more length for the pistol grip, so I set the bottom angle so that extending that line would hit the top of the recoil pad, as in the illustration I used in Part 2:
The band saw made the first cut, which I cleaned up with a chisel and block plane. Creating the open grip I wanted had resulted in a rather small grip area, so I decided to make my own grip cap out of a scrap of ebony. Mixing up black Acraglas, I epoxied it on. Here it is before I began shaping:
Here's the shaped and rough-sanded ebony cap; I'll thin it a bit later:
Two other operations had to take place: first, cutting the fore end to length; second, filling in the gap in front of the bottom metal, caused by substituting a FN commercial one I had on hand for the military one. I like a miter box for cutting the fore end at ninety degrees, and I use tape on the underside to keep splintering to a minimum.
Here's a photo showing the differences in length between the military and commercial versions of the bottom metal. Using the shorter one without guard screws of course leaves a gap in the inletting, so I patched it with a piece of the cut-off fore end. The patch itself is completely obscured, what with the rubber band putting pressure on the patch in one dimension and the bar clamp putting pressure on it in another dimension; the other end of the bar clamp is on the now flat surface of the fore end.
Here's the patch cut flush after inletting the commercial bottom metal; the brown line of epoxy will be less visible after dying the wood which is, after all, from the same blank and thus matches as well as possible:
The next post will deal with several bits of metal work: slimming down the top tang of the action for a better top line of the grip, and rounding the fore end tip.
Afterword (10/12/2014): Although I wasn't sure that removing the Monte Carlo comb was going to leave a comb high enough to use a scope, it has turned out to be fine for a scope mounted low. As my immediate use for this rifle will be for whitetails in heavy cover, I'm going to proceed by using a peep sight together with a ramped Lyman front sight (the latter just purchased inexpensively from e-Bay.)
Sunday, September 7, 2014
North to Alaska, and Back
My bride Caroline and I have just returned from our first trip to Alaska. It's a big--no, huge--state: Alaskans are fond of saying that if the state were split in two, each half would still be bigger than Texas. We experienced only a tiny portion of it, flying to Anchorage, driving a rental car down to Seward and back, and then hiking for a week in Denali National Park, but we had a wonderful time and learned a few things I thought I'd pass along to others thinking about such a trip.
1. Timing: Late August-early September is a good time to visit: few or no bugs, the aspen is turning gold, and the fall colors on the tundra are spectacular. It's cool-to-cold at night, though, which leads to 2.
2. Clothing: We stayed south of the Arctic Circle, and temperatures during the day were mostly in the 60's with some rain. Bring layers of clothing, therefore, along with a day pack to carry them and a water bottle (you can't drink the water). I wore long underwear nearly every day plus fleece, topped on occasion with rain gear. A baseball cap is useful under a hood to keep rain out of your face. I wore gloves on one day when we endured 30-mph winds. A neck gaiter and a wool hat would have been welcome.
3. Footgear: Both taiga ("small trees") and tundra can hold moisture, so I wore waterproof boots with lug soles, useful on muddy and occasionally steep trails. Bring more than enough wool socks: few things feel better after a day outdoors than putting on a pair of clean socks. We wore our boots on the plane to save space, but it's a good idea to have another comfortable pair to change into. A hiking stick gives you extra stability (if you break it down into separate sections, it may fit into your carry-on luggage).
4. Getting Around: We rented a car for the first portion of our trip. A GPS was available, but we took ours with us from home. The one day we didn't bother taking it on a trip to Eagle River in Chugach State Park was the day we had to stop and ask for directions.
You can travel to Denali by train or by bus. We took the train there and the bus back. The bus is faster and comfortable, with a few scenic stops along the way; the train is, well, a train: either you like them or you don't. There's an observation car for free--you are asked to limit your time there to 40 minutes--or you can pay more for a seat in another observation car. We were happy with the less expensive option.
5. When not in the wild: Be sure to visit museums and other centers. In Seward, for example, the Alaska SeaLife Center is spectacular (and great for kids as well). In Anchorage, we learned an enormous amount from going through the Alaska Native Heritage Center and the spectacular Anchorage Museum.
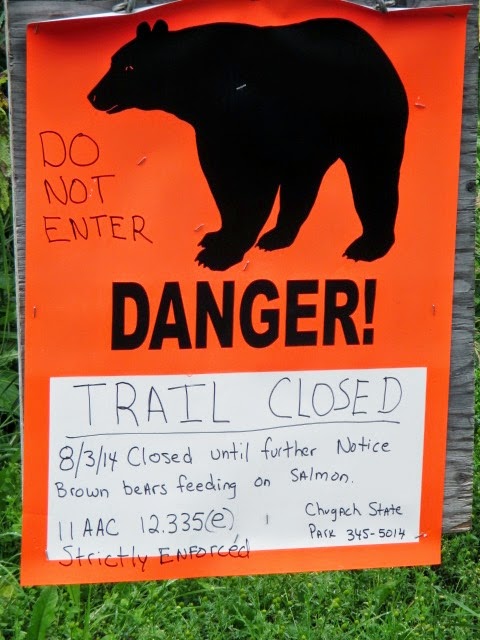
7. Safety. An obvious concluding suggestion: don't mess with the wildlife. On our hike along Eagle River, we came upon this sign:


1. Timing: Late August-early September is a good time to visit: few or no bugs, the aspen is turning gold, and the fall colors on the tundra are spectacular. It's cool-to-cold at night, though, which leads to 2.
2. Clothing: We stayed south of the Arctic Circle, and temperatures during the day were mostly in the 60's with some rain. Bring layers of clothing, therefore, along with a day pack to carry them and a water bottle (you can't drink the water). I wore long underwear nearly every day plus fleece, topped on occasion with rain gear. A baseball cap is useful under a hood to keep rain out of your face. I wore gloves on one day when we endured 30-mph winds. A neck gaiter and a wool hat would have been welcome.
3. Footgear: Both taiga ("small trees") and tundra can hold moisture, so I wore waterproof boots with lug soles, useful on muddy and occasionally steep trails. Bring more than enough wool socks: few things feel better after a day outdoors than putting on a pair of clean socks. We wore our boots on the plane to save space, but it's a good idea to have another comfortable pair to change into. A hiking stick gives you extra stability (if you break it down into separate sections, it may fit into your carry-on luggage).
4. Getting Around: We rented a car for the first portion of our trip. A GPS was available, but we took ours with us from home. The one day we didn't bother taking it on a trip to Eagle River in Chugach State Park was the day we had to stop and ask for directions.
You can travel to Denali by train or by bus. We took the train there and the bus back. The bus is faster and comfortable, with a few scenic stops along the way; the train is, well, a train: either you like them or you don't. There's an observation car for free--you are asked to limit your time there to 40 minutes--or you can pay more for a seat in another observation car. We were happy with the less expensive option.
5. When not in the wild: Be sure to visit museums and other centers. In Seward, for example, the Alaska SeaLife Center is spectacular (and great for kids as well). In Anchorage, we learned an enormous amount from going through the Alaska Native Heritage Center and the spectacular Anchorage Museum.
7. Safety. An obvious concluding suggestion: don't mess with the wildlife. On our hike along Eagle River, we came upon this sign:
A few days later, watching from the safety of our Road Scholars' bus, we saw a sow grizzly lope up a mountainside to guard her two cubs from a large boar grizzly. I had two reactions: first, these are big, powerful bears; second, surprising one might well be hazardous to your health. Ditto a cow moose with her calf, and so on. A little humility about the powerlessness of our own species is a good thing to learn, I realized.
Here are a few photos from our point-and-shoot camera.
Turnagain Arm south of Anchorage; it has the greatest tidal flows of anywhere in North America except the Bay of Fundy:
The terminus of Exit Glacier:
A bull caribou feeding in Denali:
A windy, cold day on Savage River in Denali (I'm wearing gloves and wishing I'd brought a neck gaiter and a wool hat):
Caroline and I on a rainy day hiking the Three Lakes trail in Denali. Some ten-mile trails are longer than others, and in the sporadic rain this was one of the longer ones I've ever hiked. Riley Creek is in the background.
Finally, the Great One, as "Denali" translates into English, viewed from the north. I took this shot in the morning, showing the tundra here is in its fall color, succeeded by rock and then by Denali's everlasting snow:
Sunday, August 17, 2014
Blood on My Hands is now available!
To continue with this shameless self-promotion, my book is now available from Amazon in hardcover and paperback editions; an e-book should be out the last week of August. As the title could be understood to refer to murder or zombies or something, I was advised to have a longer, more explicit subtitle. The complete title therefore is:
Blood on My Hands: How Hunting Led Me to Question Our
Relationship to Animals, Discover that DNA Unites Us All, and Realize that We
Have to Expand Our Understanding of Ecology and Take Responsibility for the
Earth
I've deliberately written for non-hunters as well as hunters. If I can't quite bring myself to describe it as a stunning work of staggering genius, that's because I was raised to be modest. Judge for yourself (grin).
Here's the link to Amazon:
Saturday, August 16, 2014
Remodeling a BRNO Mauser Sporter, Part 2
I suspect I'm a wood butcher at heart, because one of the aspects I love most about messing around with rifles is hacking away on their stocks, trying to realize my ideal of the entirely personal, elegantly functional tool. In fact, a friend once remarked to me, "Given that you like to work on stocks so much, Gerry, why don't you save money and just buy stocks instead of the entire gun?"
From one point of view, remodeling a rifle stock is like making a statue out of a block of marble: you just cut away everything that doesn't belong there. That's all well and good, but how do you know when you've gone far enough? My best answer now is, If you aren't terrified that you've cut too much away, you haven't gone far enough.
So here's the beginning of the surgery on the BRNO sporter:

 Line D above shows this relation between the flat of the grip and the heel of the butt (English stockers often decrease that angle, making Line D touch the comb a bit forward of the heel).


From one point of view, remodeling a rifle stock is like making a statue out of a block of marble: you just cut away everything that doesn't belong there. That's all well and good, but how do you know when you've gone far enough? My best answer now is, If you aren't terrified that you've cut too much away, you haven't gone far enough.
So here's the beginning of the surgery on the BRNO sporter:
Using first a bandsaw and then a plane, I cut away nearly all of the Monte Carlo comb; you can see a slight drop still remaining behind the cheekpiece. I'll switch to a block plane for the last bit. Eventually, I will be able to lay a straightedge on the comb and have all of it be in the same plane.
The white lines indicate the other alterations I plan to make. I'll thin the cheekpiece and add a shadow line, outlined now in white, while changing its contour slightly as it nears the grip.
As for the grip, it's getting surgery on its bottom and top lines. The surgery on the bottom line of the grip consists of cutting back its fullness. The new line will come back almost as far as the present screw hole for the grip cap. I'll also fit a much smaller grip cap, altering at the same time its angle so that a ruler laid on its flat will touch the heel of the butt. This is hard to describe, so here's an illustration from David L. Wesbrook's useful Professional Stockmaking (1994):
I need to add one inch to the length of pull, so I'll add a new pad after I have finished with the comb. As the distance from the rear of the bolt to the nose of the comb feels a bit cramped to me, I will also cut back the nose of the comb by 1/4" or so. Classically, the nose of the comb should be centered on the middle of the grip cap, as in Line E above, but I'll happily break that rule if I need more room for my right hand.
After beavering away, here are two photos of the work in progress. I've reattached the grip cap so you can see how much I've cut away to open up the bottom line of the grip:
I've also started to reduce the thickness of the cheekpiece. The nose of the comb is now back 1/4", but it still doesn't give me enough room. I'll cut it back farther, which should also align it with the center of the flat on the grip. The stock is well on its way to its new, classical appearance:
This sporter, like many Mausers, has a trough cut in the top of the grip from the bolt being retracted and chipping out the wood. This trough can be eliminated and the upper grip line much improved by filing the wood and metal together at the top of the grip. I'll show this in another post.
The final remodeling of the grip will consist of making it oval by slimming it down equally on both sides. A little off here and a little off there will make an enormous difference: stay tuned!
Monday, August 11, 2014
Remodeling a BRNO Mauser Sporter, Part 1
For most of the 20th Century, the cheapest way to acquire a hunting rifle was to purchase a military surplus one and remodel it. The US Government obligingly made available Krag-Jorgensens in .30-40 and later 1903 Springfields and 1917 Enfields in .30-06, while after WW II all kinds of military rifles were imported by commercial enterprises and sold as surplus.
Surplus rifles are still available, of course, but unless you're content to sporterize the military stock and to hunt with military sights, you're monetarily ahead today buying a commercial rifle. Why? Because by the time you add up the costs of a new stock, a new barrel, altering the bolt so it will clear a scope, adding iron sights or drilling and tapping for a scope, you're well into what a new sporter costs--even if you can do some of this conversion work yourself.
So why did I just purchase a converted BRNO (pronounced "Bear'-no") Mauser in 7x57mm?

BRNO (now CZ) exported 7x57's to many countries in Latin and South America. Thanks to Robert W.D. Ball's Mauser Military Rifles of the World, 3rd. ed., we can tell from the crest on the receiver with its quetzal bird that this rifle was one of the 4,000 BRNO exported to Guatemala in 1937.

Fair enough, but why was this rifle's price relatively low? I suspect that there were two reasons: first, whoever priced it didn't know that BRNO's are reputed to be among the very best of the Mauser actions. In The Mauser M91 Through M98 Bolt Actions: A Shop Manual, for example, Jerry Kuhnhausen rates the BRNO's as "highly desirable for building custom rifles" (p. 215).
The second reason for this rifle's low price, I'd guess, is that the style of its stock is no longer in fashion.

The stock is actually a fairly conservative version of what's often called the California style of the 60's and 70's: there's a white spacer in the recoil pad, but not one in the grip cap, while the fore end, although angular, does not end with an exotic tropical wood tip cut at some angle more acute than 90 degrees.
As John Barsness has pointed out, a Monte Carlo stock like this can potentially fit quite well someone with a long neck and sloping shoulders. For bettor or worse, I'm built differently, and I much prefer the lines of the so-called classic stock.
Fortunately, it's easy to decide whether remodeling this kind of stock will work out. My first concern is with the comb. Will it be high enough to use a scope if I eliminate the Monte Carlo comb, or will the comb then become so low that only iron sights will give me a good cheek weld? I first put a straightedge from the nose of the comb to the top of the butt, trying to imagine how it will look.

If that checks out, I look at the underline of the butt. Ideally, a straightedge placed along the underline and extended through the grip should come pretty close to the screw at the rear of the trigger guard. If it does, I then take a close look at the size and shape of the pistol grip. The one on this rifle is a large, full one. I like a more open grip, and the fullness here will let me cut it back a bit and thereby open it up, which I prefer for a quick offhand shot.
Finally, I evaluate the length of the fore end in relation to the length of the barrel. Just as different people will disagree on color, so too on the ideal proportions for a sporter. Here, to my eye, the fore end is too long, making the barrel look short. I was concerned enough in the store to measure the barrel. It is actually 21 1/2" long, so the fore end could be cut back to look more in proportion. If I keep a sling swivel stud in the fore end, that will have to be a bit longer; if I put on a barrel band swivel stud, I can cut the fore end shorter and thereby make the barrel look a bit longer.
Having purchased the rifle, I have some remodeling decisions to make: in addition to the barrel band vs. swivel stud on for the fore end, I need to decide whether I want to retain the military trigger. I'll also have to order a new pad and perhaps a grip cap. All these topics provide wonderful topics for delightful and obsessive thought. In subsequent posts, I'll report on what I decide and how the remodeling is progressing. And if anyone has questions or suggestions, I'd like to hear them.
Surplus rifles are still available, of course, but unless you're content to sporterize the military stock and to hunt with military sights, you're monetarily ahead today buying a commercial rifle. Why? Because by the time you add up the costs of a new stock, a new barrel, altering the bolt so it will clear a scope, adding iron sights or drilling and tapping for a scope, you're well into what a new sporter costs--even if you can do some of this conversion work yourself.
So why did I just purchase a converted BRNO (pronounced "Bear'-no") Mauser in 7x57mm?
BRNO (now CZ) exported 7x57's to many countries in Latin and South America. Thanks to Robert W.D. Ball's Mauser Military Rifles of the World, 3rd. ed., we can tell from the crest on the receiver with its quetzal bird that this rifle was one of the 4,000 BRNO exported to Guatemala in 1937.
Why was this between-the-wars Mauser a good buy? Because someone else had converted the military BRNO into a sporter and had therefore already incurred most of those expenses--and their cost wasn't reflected in the asking price! This rifle still retains its military two-stage trigger and bottom metal, but it wears either a turned down and blued military barrel or a civilian barrel in 7x57, the bolt handle has been replaced, a Buehler safety installed, and the action drilled and tapped both for a peep sight with a ramped front sight and for Weaver bases.
Fair enough, but why was this rifle's price relatively low? I suspect that there were two reasons: first, whoever priced it didn't know that BRNO's are reputed to be among the very best of the Mauser actions. In The Mauser M91 Through M98 Bolt Actions: A Shop Manual, for example, Jerry Kuhnhausen rates the BRNO's as "highly desirable for building custom rifles" (p. 215).
The second reason for this rifle's low price, I'd guess, is that the style of its stock is no longer in fashion.
The stock is actually a fairly conservative version of what's often called the California style of the 60's and 70's: there's a white spacer in the recoil pad, but not one in the grip cap, while the fore end, although angular, does not end with an exotic tropical wood tip cut at some angle more acute than 90 degrees.
As John Barsness has pointed out, a Monte Carlo stock like this can potentially fit quite well someone with a long neck and sloping shoulders. For bettor or worse, I'm built differently, and I much prefer the lines of the so-called classic stock.
Fortunately, it's easy to decide whether remodeling this kind of stock will work out. My first concern is with the comb. Will it be high enough to use a scope if I eliminate the Monte Carlo comb, or will the comb then become so low that only iron sights will give me a good cheek weld? I first put a straightedge from the nose of the comb to the top of the butt, trying to imagine how it will look.
I also retract the bolt as in the picture above, and check how close the bolt is to the comb at the nose. For using a scope, I want the bolt to barely clear the nose; for iron sights--with my aging eyes, I prefer aperture sights--there can be some distance between the bolt and comb, as here.
If that checks out, I look at the underline of the butt. Ideally, a straightedge placed along the underline and extended through the grip should come pretty close to the screw at the rear of the trigger guard. If it does, I then take a close look at the size and shape of the pistol grip. The one on this rifle is a large, full one. I like a more open grip, and the fullness here will let me cut it back a bit and thereby open it up, which I prefer for a quick offhand shot.
Finally, I evaluate the length of the fore end in relation to the length of the barrel. Just as different people will disagree on color, so too on the ideal proportions for a sporter. Here, to my eye, the fore end is too long, making the barrel look short. I was concerned enough in the store to measure the barrel. It is actually 21 1/2" long, so the fore end could be cut back to look more in proportion. If I keep a sling swivel stud in the fore end, that will have to be a bit longer; if I put on a barrel band swivel stud, I can cut the fore end shorter and thereby make the barrel look a bit longer.
Having purchased the rifle, I have some remodeling decisions to make: in addition to the barrel band vs. swivel stud on for the fore end, I need to decide whether I want to retain the military trigger. I'll also have to order a new pad and perhaps a grip cap. All these topics provide wonderful topics for delightful and obsessive thought. In subsequent posts, I'll report on what I decide and how the remodeling is progressing. And if anyone has questions or suggestions, I'd like to hear them.
Thursday, July 24, 2014
Blood on My Hands: A Shameless Self-Promotion
If you're a hunter, if you've ever wondered why on earth other people hunt, if you're at all concerned about animal rights or animal liberation, or if you're concerned about the destructive impact our species is having on the earth, you might want to read my book that will be available shortly from Amazon: Blood on My Hands.
I came to write this book because of a hunting experience that shook me to the core. Hunting by myself, I stalked and killed an antelope in Wyoming. It was the first animal I'd ever shot. After dressing it out, I looked at my watch to see what time it was. My arms were so covered in blood that I couldn't read my watch. Then I heard myself saying aloud, "I have blood on my hands!" I had no idea what I meant, but I felt marked by this blood. I kept thinking about that blood the rest of the day and I kept dreaming about it again and again that night. When I woke up the next morning, I was certain about one thing: I had to figure out what this blood meant.
Figuring it out completely took a good ten years. This book is less an argument than the record of a process of discovery, a process I tried to indicate in the subtitle: How Hunting Led Me to Question Our Relationship to Animals, Discover that DNA Unites Us All, and Realize that We Have to Expand Our Understanding of Ecology and Take Responsibility for the Earth.
Blood on My Hands differs from all previous books on hunting because it is the first to insist that hunting is a means to an end, achieving a larger, ecological consciousness. It differs from all previous books on ecology because it is the first to insist on a conception of ecology that includes us within it. Our species has become the most destructive one in the history of the earth, and we need to change how we think of ourselves in relation to the rest of life. We need to start getting our home in order before it's too late.
If Blood on My Hands sounds interesting, check it out on Amazon:
http://www.amazon.com/Blood-My-Hands-Question-Relationship/dp/1457522322/ref=sr_1_5?s=books&ie=UTF8&qid=1406140994&sr=1-5&keywords=blood+on+my+hands
Tuesday, July 15, 2014
A Windsor Armchair: Genuine or Fake?
Last week, I discovered a Windsor armchair in a local shop at a bargain price. In fifty years of looking for American eighteenth century furniture, this is the first Windsor I'd ever seen that I could afford, so I had to restrain myself from pulling out my wallet and running up to the cash register to buy it. But then I got cautious: its asking price was so low, something had to be wrong with it, right? It could be a fake. I decided to look it over carefully. Here's what I saw:

My first impression was that the red paint with gold pin striping and some turnings picked out in gold was in remarkably good shape. Bringing an older wooden chair up to date with new paint is something most of us have done at one point or another, but I recalled that this combination of red paint with gold striping was popular in the first half of the nineteenth century. If the paint indeed dated from that period, how had it remained in such good condition? That was a bit suspicious. I looked more carefully at the spindles: they too had gold striping, so faint it was almost worn completely away. That wear was reassuring.
I could see that the back railing and arm railing had suffered through the years and been repaired. Some sections of the arm rail needed to be glued. One of the back legs had broken off, been reglued, and in addition it had been reinforced with the kind of angle iron available at any hardware store. So it wasn't perfect. That was reassuring. Few fakers would break off a leg and reattach it just to make a piece look antique.
The front legs had a cylindrical portion that I vaguely associated with Windsors made in Pennsylvania, but their feet seemed a bit odd.
I then realized that the back legs didn't match the front ones. I had never really studied Windsors, but as far as I knew, the legs always matched. These don't (the angle iron brace can also be seen here):

The arms were eked out with another piece of wood of the same species to form handholds. I wasn't sure which species of wood had been used, but the grain had been carefully matched and the additional pieces had been pegged in place from the side. Here you can see how the tops of the arm supports have been split to take a wedge at right angles to the grain of the handhold, a technique often used in the eighteenth century:

The red paint was completely worn away; so too the earlier paint--black? dark green?--I could see elsewhere on the chair where the red paint had been chipped away. As the photo shows, one handhold did have a little bit of yellow still remaining. Had that been an undercoat, or what?
The back had six spindles extending to the top railing. I had a vague memory of reading that Windsors always had an uneven number of spindles. This one didn't. Very well then, this one didn't.
Finally, I looked at the chair and tried to get an overall impression of its form. Chunky, I thought at first, the chair was a bit chunky. The front legs didn't have much splay, but the back legs, although heavy, had a good rake to them. The seat was barely contoured: hollowed out a bit in the center, with minimal sculpting where the thighs would rest. The seat was tilted, however, not horizontal, so its stance appears to offer comfort rather than upright rectitude. The arm supports were turned but not dramatically so. The center and side stretchers were even less noteworthy: the turnings were swelled, but minimally, nothing dramatic. The more I looked at the chair, however, the less accurate "chunky" seemed. Understated, perhaps. Nothing about it said, "Here I am! I'm important! Look at me!" The chair just sat there, quietly confident, so to speak, that it was what it was, a comfortable chair.
So, despite its not having an uneven number of spindles and its back legs not duplicating the front, and despite my not knowing where it was from, I decided it was a genuine eighteenth century Windsor, not a fake. I happily paid the asking price.
Once home, I began to go through my furniture books to find material on Windsors. Helen Comstock's American Furniture (1962), Jonathan Fairbanks and Elizabeth Bates's American Furniture 1620 to the Present (1981), and Charles Santore's The Windsor Style in America (1997) turned out to be the most informative of the ones I owned. Santore's two volumes-in-one also include his portfolio of drawings with really helpful details.
Leafing through Santore, I was delighted to find a drawing corresponding closely to the front legs of my chair. It's the middle one below from Lancaster County, PA, and Santore gives the dates of 1765-1780 for this cylinder-and-ball leg (the foot is often called a blunt-arrow foot):

But even if the front legs were like those from Lancaster County, why were the back legs of my chair different from the front? Here too Santore is helpful: he states that Windsors were made in Lancaster County with front legs with blunt-arrow feet and with altogether different tapering rear legs--and that this difference between the front and back legs existed only in Lancaster County (85;100).
I then went up to the Cornell library to check out Nancy Goyne Evans's American Windsor Chairs (New York, 1996), a truly massive, authoritative work, one of three she's written on Windsors. One chair (Figure 3-63) has similar front legs and feet to mine, although its stretchers are considerably more dramatic; she identifies it as from the greater Lancaster County region. Evans also points out the stylistic discrepancy between its front and back legs, noting "this unprecedented union of two support designs in one chair" (111) in the Lancaster area resulted from these rural craftsmen tenaciously holding on to features long outdated in urban centers.
Presumably, the front legs are the ones no longer fashionable in Philadelphia and other cities, for the rear legs correspond to the tapered ones that became widely used. Part of this wide use is probably due to the greater ease of turning such a leg as well as the slightly greater latitude it affords in placing the side stretchers. Another conservative aspect of this chair is that the seat is thinner at the back than at the front by 1/4." That difference, plus the tilt of the seat--18" off the floor in front, but only 16 1/4" at the back--make it the Windsor equivalent of what used to be called a lolling chair.
Both Santore and Evans agree on the dates of 1760-80 for this style, but the heavier back legs and stretchers on this chair may well suggest a date near the end of this period, perhaps near the end of the 1780's or even a bit later. By the turn of the nineteenth century, square-back, "fancy" chairs had become fashionable, so it's unlikely that this chair was made after 1800.
In Lancaster County, Evans points out, in the second half of the eighteenth century, 85% of the woodworking craftsmen were German. It's highly likely, therefore, that this chair was made by a Pennsylvania German. It might also have been owned by a Pennsylvania German family, if we can judge by the later red and gold repainting. In Plate III, Santore illustrates a 1780-1800 Windsor chair with yellow striping over red paint like that on my chair, also equally well preserved, commenting that "this color combination is typical of Pennsylvania German decorated chairs of the 1830's and 1840's." As everyone knows, Lancaster County is still renowned today for its Pennsylvania Dutch--"Deutsch"--heritage.
Given its front legs with cylinder-and-ball legs and its tapered rear legs, this Windsor conforms to the style popular for sack-back chairs in Lancaster County in the second half of the eighteenth century. Any bargain should be looked at skeptically, but at rare intervals the planets coincide and a chair like this Lancaster County Windsor turns out to be genuine.

My first impression was that the red paint with gold pin striping and some turnings picked out in gold was in remarkably good shape. Bringing an older wooden chair up to date with new paint is something most of us have done at one point or another, but I recalled that this combination of red paint with gold striping was popular in the first half of the nineteenth century. If the paint indeed dated from that period, how had it remained in such good condition? That was a bit suspicious. I looked more carefully at the spindles: they too had gold striping, so faint it was almost worn completely away. That wear was reassuring.
I could see that the back railing and arm railing had suffered through the years and been repaired. Some sections of the arm rail needed to be glued. One of the back legs had broken off, been reglued, and in addition it had been reinforced with the kind of angle iron available at any hardware store. So it wasn't perfect. That was reassuring. Few fakers would break off a leg and reattach it just to make a piece look antique.
The front legs had a cylindrical portion that I vaguely associated with Windsors made in Pennsylvania, but their feet seemed a bit odd.
I then realized that the back legs didn't match the front ones. I had never really studied Windsors, but as far as I knew, the legs always matched. These don't (the angle iron brace can also be seen here):
The arms were eked out with another piece of wood of the same species to form handholds. I wasn't sure which species of wood had been used, but the grain had been carefully matched and the additional pieces had been pegged in place from the side. Here you can see how the tops of the arm supports have been split to take a wedge at right angles to the grain of the handhold, a technique often used in the eighteenth century:
The red paint was completely worn away; so too the earlier paint--black? dark green?--I could see elsewhere on the chair where the red paint had been chipped away. As the photo shows, one handhold did have a little bit of yellow still remaining. Had that been an undercoat, or what?
The back had six spindles extending to the top railing. I had a vague memory of reading that Windsors always had an uneven number of spindles. This one didn't. Very well then, this one didn't.
Finally, I looked at the chair and tried to get an overall impression of its form. Chunky, I thought at first, the chair was a bit chunky. The front legs didn't have much splay, but the back legs, although heavy, had a good rake to them. The seat was barely contoured: hollowed out a bit in the center, with minimal sculpting where the thighs would rest. The seat was tilted, however, not horizontal, so its stance appears to offer comfort rather than upright rectitude. The arm supports were turned but not dramatically so. The center and side stretchers were even less noteworthy: the turnings were swelled, but minimally, nothing dramatic. The more I looked at the chair, however, the less accurate "chunky" seemed. Understated, perhaps. Nothing about it said, "Here I am! I'm important! Look at me!" The chair just sat there, quietly confident, so to speak, that it was what it was, a comfortable chair.
So, despite its not having an uneven number of spindles and its back legs not duplicating the front, and despite my not knowing where it was from, I decided it was a genuine eighteenth century Windsor, not a fake. I happily paid the asking price.
Once home, I began to go through my furniture books to find material on Windsors. Helen Comstock's American Furniture (1962), Jonathan Fairbanks and Elizabeth Bates's American Furniture 1620 to the Present (1981), and Charles Santore's The Windsor Style in America (1997) turned out to be the most informative of the ones I owned. Santore's two volumes-in-one also include his portfolio of drawings with really helpful details.
Leafing through Santore, I was delighted to find a drawing corresponding closely to the front legs of my chair. It's the middle one below from Lancaster County, PA, and Santore gives the dates of 1765-1780 for this cylinder-and-ball leg (the foot is often called a blunt-arrow foot):
But even if the front legs were like those from Lancaster County, why were the back legs of my chair different from the front? Here too Santore is helpful: he states that Windsors were made in Lancaster County with front legs with blunt-arrow feet and with altogether different tapering rear legs--and that this difference between the front and back legs existed only in Lancaster County (85;100).
I then went up to the Cornell library to check out Nancy Goyne Evans's American Windsor Chairs (New York, 1996), a truly massive, authoritative work, one of three she's written on Windsors. One chair (Figure 3-63) has similar front legs and feet to mine, although its stretchers are considerably more dramatic; she identifies it as from the greater Lancaster County region. Evans also points out the stylistic discrepancy between its front and back legs, noting "this unprecedented union of two support designs in one chair" (111) in the Lancaster area resulted from these rural craftsmen tenaciously holding on to features long outdated in urban centers.
Presumably, the front legs are the ones no longer fashionable in Philadelphia and other cities, for the rear legs correspond to the tapered ones that became widely used. Part of this wide use is probably due to the greater ease of turning such a leg as well as the slightly greater latitude it affords in placing the side stretchers. Another conservative aspect of this chair is that the seat is thinner at the back than at the front by 1/4." That difference, plus the tilt of the seat--18" off the floor in front, but only 16 1/4" at the back--make it the Windsor equivalent of what used to be called a lolling chair.
Both Santore and Evans agree on the dates of 1760-80 for this style, but the heavier back legs and stretchers on this chair may well suggest a date near the end of this period, perhaps near the end of the 1780's or even a bit later. By the turn of the nineteenth century, square-back, "fancy" chairs had become fashionable, so it's unlikely that this chair was made after 1800.
In Lancaster County, Evans points out, in the second half of the eighteenth century, 85% of the woodworking craftsmen were German. It's highly likely, therefore, that this chair was made by a Pennsylvania German. It might also have been owned by a Pennsylvania German family, if we can judge by the later red and gold repainting. In Plate III, Santore illustrates a 1780-1800 Windsor chair with yellow striping over red paint like that on my chair, also equally well preserved, commenting that "this color combination is typical of Pennsylvania German decorated chairs of the 1830's and 1840's." As everyone knows, Lancaster County is still renowned today for its Pennsylvania Dutch--"Deutsch"--heritage.
Given its front legs with cylinder-and-ball legs and its tapered rear legs, this Windsor conforms to the style popular for sack-back chairs in Lancaster County in the second half of the eighteenth century. Any bargain should be looked at skeptically, but at rare intervals the planets coincide and a chair like this Lancaster County Windsor turns out to be genuine.
If anyone knows of similar examples, please let me know!Thursday, July 10, 2014
Duly Noted: Useful References for Proof Marks
I've just discovered that Rob and Abby Mouat's Cornell Publications offers a free listing of proof marks at http://www.cornellpubs.com/Catalog/proof-marks-intl.pdf.
Not only do the Mouats offer something like 5,000 reprints of gun catalog from makers and merchandizers, but their newsletter is free and filled with interesting material, some relevant to firearms and some not: the current one has a video of a Toyota SUV being driven on two wheels while five or six Saudis take off and then replace the two other tires--incredible! I'm hoping my grandson doesn't see it! And the Rants and Raves every month are always worth a chuckle.
Check them out: they provide a wonderful service at very reasonable cost.
Added 8/11/2016: Another useful reference is Gerhard Wirnsberger's Standard Directdory of Proof Marks, With WWII Germand Ordnance Codes. Translated by R. A. Steindler, it's distributed by Blacksmith Publishers Corporation.
Friday, July 4, 2014
The New Fly Fisher zine and Yours Truly
Reluctant as I am to seek publicity, full disclosure requires acknowledging that several photos of me have appeared in Ian Martin's informative article on fishing caddis flies, "All Hail the Caddis!", in The New Fly Fisher zine (Summer, 2014). Ian and I were fishing the upper Grand River near Fergus, Ontario, at the time, several years ago, and Ian positively refused to let me put on the balaclava I typically wear to elude the paparazzi. He did agree, however, to show as little of my face as possible. So, if you want to check it out, click on the page number in the table of contents, or page through to Ian's article (p. 134): I'm the one wearing the blue shirt.
Anonymous photos of me aside, The New Fly Fisher zine has knowledgeable articles, wide coverage, and excellent photography. Best of all, a subscription is free.
Anonymous photos of me aside, The New Fly Fisher zine has knowledgeable articles, wide coverage, and excellent photography. Best of all, a subscription is free.
Tuesday, June 24, 2014
Cleaning Gunstocks and Wood Furniture
To make a simple, effective, and inexpensive cleaner for wood--furniture, gunstocks, axe handles, what have you--simply pour some boiled linseed oil into a container and add the same amount of turpentine or mineral spirits (I use odorless mineral spirits). Dip some 0000 (pronounced "4 Ought") steel wool into the mix, squeeze out most of the liquid, and gently rub with the grain of the wood. Then wipe off with an old cloth. Twenty-four hours later, wipe dry again. Simple, right?
This cleaner works because the turpentine or mineral spirits dissolves wax, grease, and residue from fingerprints, as well as those small paint flecks from repainting a room with a roller. The linseed oil restores some color to the wood and appears to revive the existing finish. 0000 steel wood is the finest grade, so it cleans without scratching.
Here are Before and After photos of a neglected walnut stock from a U.S. 1898 Krag carbine. As found, before cleaning:


Some notes on use: Boiled linseed oil, not raw.
Linseed oil can spontaneously combust, so dispose of the steel wool and rags carefully. I wet them with water and then put them in a plastic bag.
Don't slop it on: the mixture can stain upholstery or your clothes or carpeting.
Don't take this mixture internally: it's bad for your health.
Use the steel wool with a light touch: you're not trying to get down to bare wood but to clean the finish. Two light goings-over are far better than one heavy-handed one.
Don't skip the twenty-four hours later wipe-down. If you missed some areas, the mineral spirits will evaporate, but the linseed oil will remain sticky and collect dust before it dries.
If you want to wax the piece, wait until you can't smell the linseed oil any more.
Finally, three "If's": If the wood is antique cherry, test on an area you can't see. Some old cherry was stained but never given a finish coat, and this mix can dissolve the stain. If you're not sure what the wood is, test it where you can't see it.
If you have a funky painted piece with the paint going chalky, don't mess with it. That patinated surface is part of its interest. As John T. Kirk has commented in his excellent Impecunious Collector's Guide to American Antiques, "buy it ratty and leave it alone."
If the piece of furniture (or gun) is museum quality, don't touch it. I've read statements by curators saying that this mix will blacken wood. I've used this mix for fifty years on walnut and mahogany and haven't seen that happen. But don't gamble: get in touch with a local museum and ask for guidance. The museum people will bless you for it.
This cleaner works because the turpentine or mineral spirits dissolves wax, grease, and residue from fingerprints, as well as those small paint flecks from repainting a room with a roller. The linseed oil restores some color to the wood and appears to revive the existing finish. 0000 steel wood is the finest grade, so it cleans without scratching.
Here are Before and After photos of a neglected walnut stock from a U.S. 1898 Krag carbine. As found, before cleaning:
Some original finish can be seen, but it's gone from most of the stock. Water has stained the butt end,and, unfortunately, this cleaner can do nothing about that.
After cleaning with the linseed oil and mineral spirits applied with 0000 steel wool:
Obviously, the cleaning has evened out the color of the stock. Perhaps that should be qualified: evened out the color of the wood--if you look closely an inch or so away from the butt plate, you can see lighter spots where someone filled some holes with plastic wood. But now the stock no longer looks neglected.
Some notes on use: Boiled linseed oil, not raw.
Linseed oil can spontaneously combust, so dispose of the steel wool and rags carefully. I wet them with water and then put them in a plastic bag.
Don't slop it on: the mixture can stain upholstery or your clothes or carpeting.
Don't take this mixture internally: it's bad for your health.
Use the steel wool with a light touch: you're not trying to get down to bare wood but to clean the finish. Two light goings-over are far better than one heavy-handed one.
Don't skip the twenty-four hours later wipe-down. If you missed some areas, the mineral spirits will evaporate, but the linseed oil will remain sticky and collect dust before it dries.
If you want to wax the piece, wait until you can't smell the linseed oil any more.
Finally, three "If's": If the wood is antique cherry, test on an area you can't see. Some old cherry was stained but never given a finish coat, and this mix can dissolve the stain. If you're not sure what the wood is, test it where you can't see it.
If you have a funky painted piece with the paint going chalky, don't mess with it. That patinated surface is part of its interest. As John T. Kirk has commented in his excellent Impecunious Collector's Guide to American Antiques, "buy it ratty and leave it alone."
If the piece of furniture (or gun) is museum quality, don't touch it. I've read statements by curators saying that this mix will blacken wood. I've used this mix for fifty years on walnut and mahogany and haven't seen that happen. But don't gamble: get in touch with a local museum and ask for guidance. The museum people will bless you for it.
Friday, June 13, 2014
Deciphering Belgian Proof Marks
A reader has asked me to say something about Belgian proof marks. I've owned two Belgian side by sides and two Browning Superposed, so I guess I can say that I have some acquaintance with twentieth century ones, but unlike my posts on antique English shotguns I don't have an antique Belgian one at hand to describe. I'll restrict myself therefore to saying something about gun making in Belgium and offering some proof marks. To my knowledge, there isn't a book out that covers European proof marks: If someone knows about such a book, please add a comment with that information. [Later note: Gerhard Wirnsberger has written The Standard Directory of Proof Marks, translated byR. A. Steindler; it is available from Blacksmith Publishers Corporation.]
Because of its deposits of coal and iron ore, industrialization took place early in Belgium. That, plus its skilled work force and their comparatively low wages, quickly made Liège a center for gun making. Belgian firms could produce whatever was wanted at whatever price point, and the wage structure made their prices lower than their competitors. As you might imagine, many, many Belgian guns were exported to other countries for resale.
What I first look for are the marks indicating country of origin. The US never had a proof house, of course, so you have to rely on maker's names--which may well be deceptive versions of famous makers (Purdie for Purdey, for example)--and addresses (sometimes deceptive, as well). But if the gun is a British or Continental breechloader, it should have proof marks on the water table of the receiver and on the barrel flats near the breech.
Here's an illustration of early twentieth century Belgian proofs from W. W. Greener's The Gun and Its Development, 9th edition (1910):


Other important marks give information about the barrels:

"70" is the metric equivalent of our 2 3/4" chamber length; many older guns of course will have some metric number like 65, equivalent to 2 1/2" or 2 9/16". The gauge or bore is typically indicated by a "12" or "16," often accompanied by the chamber length (see Kennett's no. 33 below).
Choke is so indicated in English (why, I don't know), and it can be an indication of date:

Here is Lee Kennett's complete listing of Belgian proof marks in his "A History of Proof Marks: Gun Proof in Belgium," published in the 32nd edition of The Gun Digest (1978), 129-138.


Because of its deposits of coal and iron ore, industrialization took place early in Belgium. That, plus its skilled work force and their comparatively low wages, quickly made Liège a center for gun making. Belgian firms could produce whatever was wanted at whatever price point, and the wage structure made their prices lower than their competitors. As you might imagine, many, many Belgian guns were exported to other countries for resale.
What I first look for are the marks indicating country of origin. The US never had a proof house, of course, so you have to rely on maker's names--which may well be deceptive versions of famous makers (Purdie for Purdey, for example)--and addresses (sometimes deceptive, as well). But if the gun is a British or Continental breechloader, it should have proof marks on the water table of the receiver and on the barrel flats near the breech.
Here's an illustration of early twentieth century Belgian proofs from W. W. Greener's The Gun and Its Development, 9th edition (1910):
The first on the left and the fourth (the one that resembles a candlestick) indicate provisional proof. The second and third indicate it was proofed at Liège. The one on the far right is the definite proof for nitro, or smokeless powder.
Lee Kennett did a fine survey, "A History of Proof Marks: Gun Proof in Belgium," that was published in The Gun Digest (1978). I've reproduced Kennett's numbers in the complete list at the end of this post:
Other important marks give information about the barrels:
"70" is the metric equivalent of our 2 3/4" chamber length; many older guns of course will have some metric number like 65, equivalent to 2 1/2" or 2 9/16". The gauge or bore is typically indicated by a "12" or "16," often accompanied by the chamber length (see Kennett's no. 33 below).
Choke is so indicated in English (why, I don't know), and it can be an indication of date:
Here is Lee Kennett's complete listing of Belgian proof marks in his "A History of Proof Marks: Gun Proof in Belgium," published in the 32nd edition of The Gun Digest (1978), 129-138.
No small part of the Belgians' remarkable ability to meet the demands of a wide variety of firms trading all over the world was their willingness to go on producing type of guns that were obsolete. Flintlock fowling pieces and rifles were made for the Northwest Indian trade until the early twentieth century; so, too, percussion long guns for sale in Africa. Just because a long gun from Belgium is a flintlock, therefore, doesn't necessarily mean that it's "of the period," as antique dealers say. It could be of relatively recent manufacture. Caveat emptor! Check the proof marks!
If you are considering buying a Belgian gun, look long and hard at its quality. Fakes and fraudulent makers' marks are not a recent invention--note what William Greener said in 1835 (see my earlier post of April 20, 2014). If the price seems too good to be true, it probably is. As the old saying has it, "The buyer needs a thousand eyes; the seller, only one." The other side of the coin is that quality can indeed be there in Belgian guns: The Belgian Browning Superposed were all fine guns, while firms like Francotte, Dumoulin, or Lebeau-Courally could make guns of very high quality indeed.
Subscribe to:
Posts (Atom)