The subtitle of 52 Loaves (Algonquin Books of Chapel Hill, 2010) conveys in a suitably ironic way what Alexander's book is about: One Man's Relentless Pursuit of Truth, Meaning, and the Perfect Crust. Obsessed by memories of a peasant loaf, Alexander decides to bake one loaf of bread a week for a year, fifty two loaves, obviously, so that he can replicate that perfect loaf of bread.
Critiquing his efforts are his wife and his two teenagers, and they provide a skeptical and sometimes comic commentary on his efforts. He seeks out professional help, and he even builds a wood-fired oven in his backyard, or, rather, he builds two, for the first one collapses. He takes a bread-baking course at The Ritz in Paris, one that emphasizes quantity over quality. And then, by a process that I don't want to spoil by revealing, he finds himself a special guest of an ancient abbey in Normandy, l'Abbaye Saint-Wandrille de Fontenelle, engaged to teach two of the monks how to bake their daily bread.
This monastic experience not only gives him the organizing principle for 52 Loaves, a division by the canonical hours of Vigils, Lauds, Terce, etc., but makes him reconsider his entire concept of spirituality. Even though he can't understand the Latin of the Gregorian chants, they begin to work on him in unexpected ways. For a week, he too is in the world but not of it.
My only criticism of 52 Loaves is that Alexander is not forthcoming about what his experiences in the abbey really amount to. He admits to a problem of re-entry when he returns to his home in the Hudson River valley, but he doesn't want to tell his family about it, and unfortunately we don't learn much about it either. Like the subtitle's juxtaposition of the pursuit of truth and meaning with the perfect crust, we are forced to lower our expectations: we are told in detail not what he took away with him from the abbey but how after his return he ruined their kitchen oven, and then ruined its replacement as well. The reader must rest content with his recipes.
Postscript: for other books on bread and bread making, see my earlier post, "Homemade Bread to Die For, Part 5 (2/28/2014).
Hits and Misses

Tuesday, October 28, 2014
Tuesday, October 14, 2014
Duly Noted: What and How Deer See
"Duly Noted" refers to material by others that I believe to be interesting. In the current issue of Petersen's Hunting (Nov. 2014), Ben O'Brien discusses the result of a recent study of whitetail deer by Dr. Bradley Cohen and his colleagues at the Warnell School of Forestry and Natural Resources, Univ. of Georgia, and Dr. Cohen's responses to interview questions.
It turns out that deer not only see somewhat differently than humans, but don't see as well, either. If you squint and keep on squinting, you're replicating to some degree how a deer sees: everything is blurry and in the same focus.
Within this blurry focus, however, some colors are better perceived than others. Blue, violet, and near ultraviolet light are seen more clearly by deer than other colors. Near sunrise and sunset, blue and UV makes up much of the light available, and that's what deer see better than other colors. So keep those jeans at home, boy.
And camo? Apparently, depth in camo patterns isn't important, but the gray parts in camo reflect blue or UV light. Just what a hunter wants, right? A camo that, far from disguising human presence, makes him or her more visible during the so-called "best" times to hunt, early and late! Their study reinforces what has become quite well known: don't wash hunting clothes in detergents with brightening agents, which absorb light in the UV region of the color spectrum and re-emit light in the blue region.
Dr. Cohen's study appeared in the Wildlife Society Bulletin, May 2014; an abstract can be found at http://onlinelibrary.wiley.com/doi/10.1002/wsb.438/abstract.
Saturday, October 11, 2014
Remodeling a BRNO Mauser sporter, Part 5
Epoxy bedding is straightforward enough, but the devil lies in the details. There are a number of explanations about how to do this: three I especially like are "Simple Stock Bedding" by John Barsness in his Obsessions of a Rifle Loony (Deep Creek Press, 2010), a book every firearms enthusiast should own, Patrick Sweeney's "Glass Bedding" in his excellent Gunsmithing Rifles (Krause Publications, 1999), and "The Experience of Glass Bedding a Rifle Stock" by Bryce Towsley in his Gunsmithing Made Easy (Stoeger Publishing, 2006), which has detailed photographs.
The key point to remember is that if you don't apply release agent to every part that needs it, you can glue the stock to the barreled action. Some people like to use floor or furniture wax as a release agent. I prefer some combination of three release agents: Brownell's Acra-Release Aerosol; modeling clay to fill screw holes and crevices where you don't want epoxy; and Pasco PVC 10 mil Pipe Wrap for masking off the barrel.
I use Brownell's Acraglas Gel rather than Acraglas, as it pretty much stays put where you apply it.
Some other suggestions: Score or crosshatch the wood with a sharp knife or chisel so the epoxy adheres.
Don't forget to put release agent on the action screws, as well. Forster stockmaker's handscrews are useful here.
Q-tips are good place holders for the receiver screws on a bolt action. For Mausers, which have the front screw going into the recoil lug, you can put a Q-tip in the recoil lug, lower the receiver into the epoxy on the stock, and then pull the Q-tip out of the bottom metal.
To facilitate getting the barreled action out of the stock, you don't want epoxy in front of the recoil lug, so put release agent on the front of the lug.
I follow the practice recommended by John Barsness for bedding Mausers, which have a narrow recoil lug: I bed the first inch of the barrel as well, so I keep the Pipe Wrap off the first inch of the barrel and spray receiver and that inch of barrel with release aerosol (twice).
If you need to fill gaps along the receiver or the barrel in the fore end, put masking tape along the top of the stock so you can peel it off after it cures.
Tighten the screws only moderately: I tighten them and then back them off half a turn.
Check the epoxy after five hours. After five hours, the epoxy has set up enough to be semi-solid, but it's yielding enough to be pulled apart if you've made a mistake. If some has gone where it shouldn't, you can still cut it easily with a knife or chisel and remove it. Then screw it back together, back off the screws a half turn, and let it set.
To remove the barreled action from the stock, turn the rifle upside down and tap the heel of the butt on a surface that won't harm the stock. You should then be able to remove the barreled action. Repeat, more firmly, as necessary. If it still won't budge, back out the screws until they are just engaged and hit them with a mallet. If that doesn't work, call Brownell's (641 623-5401).
You may discover some voids in the bedding. Here, for example, is the BRNO after the first bedding:
 Some gaps in the bedding are obvious. Not to worry: just mix up some more epoxy and fill in the gaps. Wipe down the metal and reapply release agent, etc.
Here's how it looked after another application:

The key point to remember is that if you don't apply release agent to every part that needs it, you can glue the stock to the barreled action. Some people like to use floor or furniture wax as a release agent. I prefer some combination of three release agents: Brownell's Acra-Release Aerosol; modeling clay to fill screw holes and crevices where you don't want epoxy; and Pasco PVC 10 mil Pipe Wrap for masking off the barrel.
I use Brownell's Acraglas Gel rather than Acraglas, as it pretty much stays put where you apply it.
Some other suggestions: Score or crosshatch the wood with a sharp knife or chisel so the epoxy adheres.
Don't forget to put release agent on the action screws, as well. Forster stockmaker's handscrews are useful here.
Q-tips are good place holders for the receiver screws on a bolt action. For Mausers, which have the front screw going into the recoil lug, you can put a Q-tip in the recoil lug, lower the receiver into the epoxy on the stock, and then pull the Q-tip out of the bottom metal.
To facilitate getting the barreled action out of the stock, you don't want epoxy in front of the recoil lug, so put release agent on the front of the lug.
I follow the practice recommended by John Barsness for bedding Mausers, which have a narrow recoil lug: I bed the first inch of the barrel as well, so I keep the Pipe Wrap off the first inch of the barrel and spray receiver and that inch of barrel with release aerosol (twice).
If you need to fill gaps along the receiver or the barrel in the fore end, put masking tape along the top of the stock so you can peel it off after it cures.
Tighten the screws only moderately: I tighten them and then back them off half a turn.
Check the epoxy after five hours. After five hours, the epoxy has set up enough to be semi-solid, but it's yielding enough to be pulled apart if you've made a mistake. If some has gone where it shouldn't, you can still cut it easily with a knife or chisel and remove it. Then screw it back together, back off the screws a half turn, and let it set.
To remove the barreled action from the stock, turn the rifle upside down and tap the heel of the butt on a surface that won't harm the stock. You should then be able to remove the barreled action. Repeat, more firmly, as necessary. If it still won't budge, back out the screws until they are just engaged and hit them with a mallet. If that doesn't work, call Brownell's (641 623-5401).
You may discover some voids in the bedding. Here, for example, is the BRNO after the first bedding:
Here's how it looked after another application:
A tiny bit has to be added to smooth out the bedding for the barrel, but it's functionally complete.
The next in this series will cover finishing the stock.
Monday, October 6, 2014
Remodeling a BRNO Mauser Sporter, Part 4
Now comes the patient, painstaking part: the drama of cutting off big chunks of wood is over. At this point, it helps to make a check list for the sequence you need to follow. For example, I am going to add a barrel band for a sling swivel, so I don't want to attach the front sight before I do that. (You ask, why do I mention something so obvious? Never mind!)
To make matters even less dramatic, much of the work that needs to be done will not be visible, as in floating the barrel or supporting the recoil lug with epoxy. I can promise, however, that following all these steps does eventually result in a real sense of satisfaction and, sometimes, a year or so later, a sense of wonder: "I did that? It looks pretty good!"
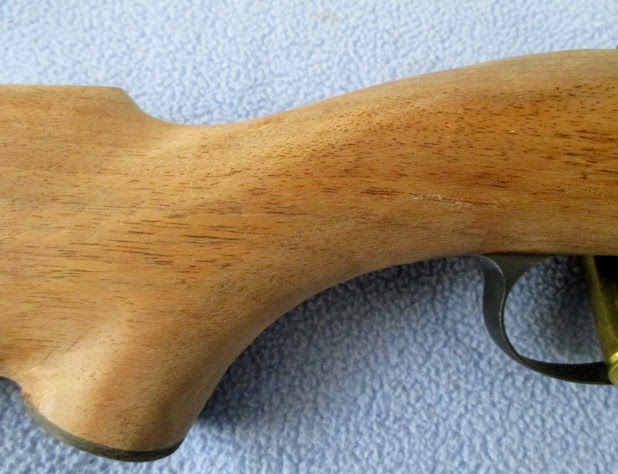
For now, let's begin with the two tasks I mentioned in my last post: filing down the tang of the receiver and rounding the squared-off fore end. Each one affects how the rifle will look. Here's a picture of the Mauser tang in a military stock:

Notice the wood chipped out behind the tang? That's why you don't want to copy this configuration in a Mauser sporter: working the bolt will chip out some wood. The solution is simple: just file metal and wood together until the rear of the channel barely protrudes above the tang and stock. Here's how the BRNO came out (later, I'll cold blue the tang):

So, no fore end tip. That's OK: As the great stock maker Alvin Linden commented, fore end tips don't do anything! For a classic look, the tip of the fore end should be rounded. Here, it helps to have the depth of the fore end pretty close to its width. One method of making it round is shown on Midway's video. I just eyeball it and take my time. If it seems off, just measure the depth (or width), divide that in two for a radius, and then scribe half a circle on a piece of paper, cut it out, and hold it against the wood. It will be immediately obvious where it's off. Restrain yourself from making it perfect, for fine sanding will come later, and that can easily distort curves and, especially, complex curves.

In the next post, I'll talk about epoxy bedding the action. Whoever inlet this rifle did an excellent job, apparently using a very small gouge. But the epoxy, carefully applied, will produce an even better job where it counts most, around the recoil lug.
To make matters even less dramatic, much of the work that needs to be done will not be visible, as in floating the barrel or supporting the recoil lug with epoxy. I can promise, however, that following all these steps does eventually result in a real sense of satisfaction and, sometimes, a year or so later, a sense of wonder: "I did that? It looks pretty good!"
For now, let's begin with the two tasks I mentioned in my last post: filing down the tang of the receiver and rounding the squared-off fore end. Each one affects how the rifle will look. Here's a picture of the Mauser tang in a military stock:
Notice the wood chipped out behind the tang? That's why you don't want to copy this configuration in a Mauser sporter: working the bolt will chip out some wood. The solution is simple: just file metal and wood together until the rear of the channel barely protrudes above the tang and stock. Here's how the BRNO came out (later, I'll cold blue the tang):
Not only will you not have a problem with wood chipping out, but you will gain a better line for the top of the pistol grip. Now its slope looks less like a ski jump: the top line is more gradual and more graceful:
You have two choices in regard to the squared-off fore end. One is to add an ebony tip; the other is simply to round it off. I like ebony tips, but this barrel is only 21 1/2" long, so space is tight. To have the fore end in proportion to the length of the barrel, I need to have a barrel band for the sling swivel. That in itself doesn't preclude an ebony tip, but I have long arms (a 35" sleeve), so my forward hand will have to be very close to the end of the stock. Given that I want some checkering where my hand goes, there simply isn't room for a fore end tip.
So, no fore end tip. That's OK: As the great stock maker Alvin Linden commented, fore end tips don't do anything! For a classic look, the tip of the fore end should be rounded. Here, it helps to have the depth of the fore end pretty close to its width. One method of making it round is shown on Midway's video. I just eyeball it and take my time. If it seems off, just measure the depth (or width), divide that in two for a radius, and then scribe half a circle on a piece of paper, cut it out, and hold it against the wood. It will be immediately obvious where it's off. Restrain yourself from making it perfect, for fine sanding will come later, and that can easily distort curves and, especially, complex curves.
In the next post, I'll talk about epoxy bedding the action. Whoever inlet this rifle did an excellent job, apparently using a very small gouge. But the epoxy, carefully applied, will produce an even better job where it counts most, around the recoil lug.
Saturday, October 4, 2014
Moose + Car Photo
Having driven through Moose Pass twice in our trip to Alaska and, in addition, having seen many, many yellow highway signs warning drivers to watch out for moose, I was impressed by this photo included in the current newsletter of Cornell Publications (not to be confused with the university or college by that name, but a catalog reprinting business owned by Rob and Abby Mouat: http://www.cornellpubs.com/. They provide a wonderful service at a very reasonable cost).
A moose has such long legs that when it's hit by a car, the body comes through the windshield, typically killing the driver. In this case, the driver was apparently born under a lucky star.

A moose has such long legs that when it's hit by a car, the body comes through the windshield, typically killing the driver. In this case, the driver was apparently born under a lucky star.
The lady driving the car apparently walked away with minor injuries!
thanks to Dick Carleton
Subscribe to:
Posts (Atom)