After looking at a number of websites, I ordered a kit from Tombstone Gun Grips of White City, OR. Its website has detailed instructions for making templates from 3x5 index cards; Dave Corbin casts the polyurethane resin grips from these templates. Although the web site warned that there might be a rather long interval before the order could be filled, my kit--two grips and two spacers--arrived in just a few weeks.
The instructions are quite detailed. The first step is to make sure that the grips are oversized in all dimensions. It's relatively easy to reduce them, but not to make them larger. If they are too small, Dave Corbin will replace them as long as they haven't been altered.
The instructions recommend using contact cement or Gorilla Glue to glue the spacer to first one grip and then the other. I readily admit to not being the most adept person at gluing objects together, and my previous mistakes have made me prefer glues that are reversible. That is, if you make a mistake, you can take the pieces apart and start over again. Contact cement made me uneasy because I almost never have used it. As for Gorilla Glue, which I have used, I was pretty sure that it was not reversible. I called the company to check: once it's set up, I was told, it's permanent. I decided therefore to use Brownell's ACRAGLAS epoxy, which can be reversed with a heat gun.
The process begins with flattening the grip frame. Then you flatten the frame side of each grip. As the instructions recommend, I used 100 grit paper on a flat surface--in my case, the surface of my drill press table. The instructions suggest that you paint what you want to flatten with a magic marker. Assuming you've held the piece vertical, when all the black marks are erased, the surface is flat. Next, work on the corner where the each grip joins the frame: everything follows from this angle being correct. My grips were close, but each one required some judicious sanding and trying before it fit.
While the grips are still a bit oversized, fit the spacer. Here is where I made the first of my three mistakes. The instructions state, "Shape the spacer to fit between the hammer spring and the back strap. It must be as close to a snug fit as you can make it." Two spacers came with the kit, so I fitted the one with the curve that most closely approximated the inside curve of the back strap and glued it to the right grip panel, clamping them with a C clamp and rubber bands.

I could have avoided this mistake by looking more closely at the original wooden grip. Fortunately, the solution was simple. I measured the gap between the bottom of my glued spacer and the frame and cut a piece from the second spacer to fit. Some sanding and fitting soon made it a snug fit, so I epoxied that extension to the grip as well.

The spacer will now protrude above the frame on the remaining side. The instructions say to make the spacer flush with the frame but leave the method up to you. I used a piece of 100 grit sandpaper wrapped around a finger plane (with the blade raised, of course), making sure that the base of the small plane was always over two sides of the grip frame.
This approach worked well for making the spacer flush with the frame, but--my second mistake--I failed to realize that using epoxy to glue the second grip to the spacer would push the grip away from the spacer. Even a thin layer of epoxy has volume, after all, so epoxy between flush surfaces must leave a narrow but discernible gap. That was the bad news.
The good news was that the epoxy was reversible. My heat gun mysteriously had gone missing from my shop, so I directed the heat from my wife's hair dryer to the spacer and soon had the bond weakening. A bit more heat and I could separate the two pieces and scrape off the epoxy. Making sure to keep the side of the spacer flat, I sanded it until all of it was just a tad below the edges of the back strap. That gap would accommodate the epoxy and still keep the edges of the grip tight against the grip frame. Six rubber bands held the grip in place while the epoxy cured.

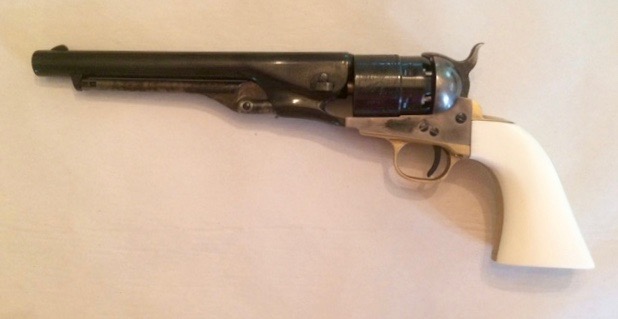
Next came the final fitting and polishing of the grips. I started with 220 grit paper with the grips off the frame, putting them back on to check my progress. I soon decided, however, that the quickest way to a flush fit between brass grip straps and poly grips was to depart from the instructions and sand them simultaneously in a shoe-shining fashion. I took the sandpaper and backed it the long way with duct tape. I then cut strips into the widths I needed. As best I could, I was careful to follow the curves of the original grip. The brass of course became scratched, but each successive grit lessened the scratches. After sanding with 600 grit, I thought I was through. Two thin coats of wax, and it looked pretty darn good.

And that was how I made my third mistake: I depended on artificial light to determine I was through. Given the number of gun stocks I've refinished, I should have known better! The grips were nicely fitted, but looking at them in natural, raking light showed up a number of scratches I had simply not noticed in artificial light. I marked and sanded each one, and then went through the grades of sandpaper all over again, finishing up this time with 1000 and then 1500 grit--all in natural light. This time, the grips passed scrutiny.
Two thin coats of Renaissance wax made them look even better. Here's the result: