In Pukka's Promise: The Quest for Longer-Lived Dogs (Houghton Mifflin Harcourt, 2013), Ted Kerasote provides a far-ranging investigation of what we know about canine breeding, nutrition, vaccination, sterilization, and life span. Woven through this hefty book of 452 pages are accounts of his finding a Lab puppy which he names Pukka (pronounced Puck'a, from the Hindi for First Class) and the methods he used to train him as the other member of his household.
Anyone with a dog or contemplating getting a dog will find much of interest here. Kerasote explodes the practice of annual vaccinations, provides alarming information about feeding kibble, and reveals that vets continue to spay and neuter--instead of doing tubal ligations and vasectomies--because those are the operations they were taught to do in vet school. And he obligingly provides notes so that his readers can follow up and come to their own conclusions.
The one drawback to this informative book concerns Kerasote's conversations with Pukka. Show me someone who doesn't talk to her or his dog, and I'll show you a dreary person indeed. The problem is that Kerasote also supplies Pukka's half of the conversations, and I find this truly cringe-inducing. Given that one side of these verbal exchanges is fictional, the old advice for fiction writers remains valid here: show, don't tell.
That aside, Ted Kerasote's Pukka's Promise is well researched, engagingly written, and thought-provoking.
Hits and Misses

Tuesday, September 30, 2014

Wednesday, September 24, 2014
Blood on My Hands now available on Kindle
I'm happy to announce that Blood on My Hands is now out as an e-book. The price of the Kindle edition on Amazon is $9.99. (If anyone knows why it takes so long to produce an electronic text from a printed one, I'd like to hear about it.)
Friday, September 19, 2014
Remodeling a BRNO Mauser Sporter, Part 3
When I wasn't staggering through the taiga or the tundra in our recent trip to Alaska, I found myself happily contemplating how this remodeled BRNO sporter in 7x57mm should look. I wasn't sure that removing the last vestige of the Monte Carlo comb was going to leave me with enough comb height to use a scope, so I decided to make a defect a virtue and set up the rifle with a Lyman peep sight (it was already drilled and tapped for one). I'd have to shop for another ramped front sight, one long enough to use or to hide the existing two blind screws.
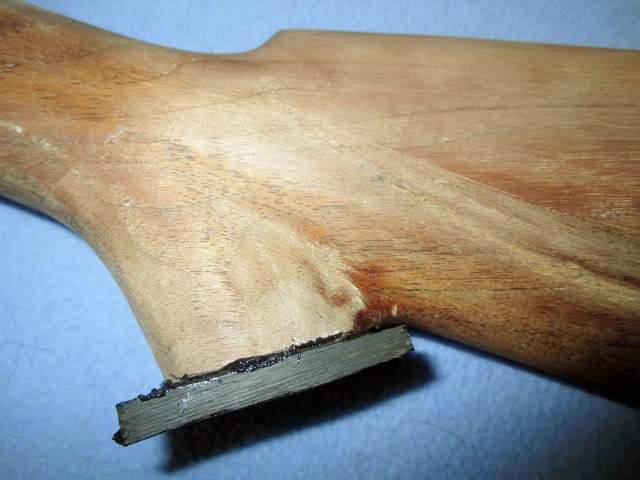
I ordered a 1" red pad from Galazan, knowing from experience that it was easy to sand to fit. I forgot, though, that it comes without screws (why, I don't know), but I managed to turn up two that would work. Attaching the pad was relatively straightforward. As the outer surface of the pad was not cut for the screws, I inserted them from the rear and pressed the pad with the inverted screws down on my bench. With a sharp knife, I made two small slits where the points stressed the material. Some Vaseline on the screws, and they entered the pad fairly easily. I used the original hole for the top screw, but the lower one did not line up (it almost never does). Not a problem: I glued in my favorite tapered dowel, a chopstick, and then cut it flush when the glue had dried. Then, after carefully positioning the pad on the stock, engaging the top screw, and inserting the bottom screw in its place, I tapped it to mark its position. For this kind of drilling, I much prefer an eggbeater hand drill: it's a bit slower, so I have more time to correct before something goes really wrong.
I worked down the pad to fit by using a hacksaw to saw off excess, then, carefully, a belt sander, and finished up with sandpaper on a block. For reasons I'm not clear about, 220 grade cuts the pad more cleanly than 100 grade.
Once the pad was in place, I could adjust the angle of the grip cap. I didn't need any more length for the pistol grip, so I set the bottom angle so that extending that line would hit the top of the recoil pad, as in the illustration I used in Part 2:

Here's the shaped and rough-sanded ebony cap; I'll thin it a bit later:

Two other operations had to take place: first, cutting the fore end to length; second, filling in the gap in front of the bottom metal, caused by substituting a FN commercial one I had on hand for the military one. I like a miter box for cutting the fore end at ninety degrees, and I use tape on the underside to keep splintering to a minimum.
Here's a photo showing the differences in length between the military and commercial versions of the bottom metal. Using the shorter one without guard screws of course leaves a gap in the inletting, so I patched it with a piece of the cut-off fore end. The patch itself is completely obscured, what with the rubber band putting pressure on the patch in one dimension and the bar clamp putting pressure on it in another dimension; the other end of the bar clamp is on the now flat surface of the fore end.


I ordered a 1" red pad from Galazan, knowing from experience that it was easy to sand to fit. I forgot, though, that it comes without screws (why, I don't know), but I managed to turn up two that would work. Attaching the pad was relatively straightforward. As the outer surface of the pad was not cut for the screws, I inserted them from the rear and pressed the pad with the inverted screws down on my bench. With a sharp knife, I made two small slits where the points stressed the material. Some Vaseline on the screws, and they entered the pad fairly easily. I used the original hole for the top screw, but the lower one did not line up (it almost never does). Not a problem: I glued in my favorite tapered dowel, a chopstick, and then cut it flush when the glue had dried. Then, after carefully positioning the pad on the stock, engaging the top screw, and inserting the bottom screw in its place, I tapped it to mark its position. For this kind of drilling, I much prefer an eggbeater hand drill: it's a bit slower, so I have more time to correct before something goes really wrong.
I worked down the pad to fit by using a hacksaw to saw off excess, then, carefully, a belt sander, and finished up with sandpaper on a block. For reasons I'm not clear about, 220 grade cuts the pad more cleanly than 100 grade.
Once the pad was in place, I could adjust the angle of the grip cap. I didn't need any more length for the pistol grip, so I set the bottom angle so that extending that line would hit the top of the recoil pad, as in the illustration I used in Part 2:
The band saw made the first cut, which I cleaned up with a chisel and block plane. Creating the open grip I wanted had resulted in a rather small grip area, so I decided to make my own grip cap out of a scrap of ebony. Mixing up black Acraglas, I epoxied it on. Here it is before I began shaping:
Here's the shaped and rough-sanded ebony cap; I'll thin it a bit later:
Two other operations had to take place: first, cutting the fore end to length; second, filling in the gap in front of the bottom metal, caused by substituting a FN commercial one I had on hand for the military one. I like a miter box for cutting the fore end at ninety degrees, and I use tape on the underside to keep splintering to a minimum.
Here's a photo showing the differences in length between the military and commercial versions of the bottom metal. Using the shorter one without guard screws of course leaves a gap in the inletting, so I patched it with a piece of the cut-off fore end. The patch itself is completely obscured, what with the rubber band putting pressure on the patch in one dimension and the bar clamp putting pressure on it in another dimension; the other end of the bar clamp is on the now flat surface of the fore end.
Here's the patch cut flush after inletting the commercial bottom metal; the brown line of epoxy will be less visible after dying the wood which is, after all, from the same blank and thus matches as well as possible:
The next post will deal with several bits of metal work: slimming down the top tang of the action for a better top line of the grip, and rounding the fore end tip.
Afterword (10/12/2014): Although I wasn't sure that removing the Monte Carlo comb was going to leave a comb high enough to use a scope, it has turned out to be fine for a scope mounted low. As my immediate use for this rifle will be for whitetails in heavy cover, I'm going to proceed by using a peep sight together with a ramped Lyman front sight (the latter just purchased inexpensively from e-Bay.)
Sunday, September 7, 2014
North to Alaska, and Back
My bride Caroline and I have just returned from our first trip to Alaska. It's a big--no, huge--state: Alaskans are fond of saying that if the state were split in two, each half would still be bigger than Texas. We experienced only a tiny portion of it, flying to Anchorage, driving a rental car down to Seward and back, and then hiking for a week in Denali National Park, but we had a wonderful time and learned a few things I thought I'd pass along to others thinking about such a trip.
1. Timing: Late August-early September is a good time to visit: few or no bugs, the aspen is turning gold, and the fall colors on the tundra are spectacular. It's cool-to-cold at night, though, which leads to 2.
2. Clothing: We stayed south of the Arctic Circle, and temperatures during the day were mostly in the 60's with some rain. Bring layers of clothing, therefore, along with a day pack to carry them and a water bottle (you can't drink the water). I wore long underwear nearly every day plus fleece, topped on occasion with rain gear. A baseball cap is useful under a hood to keep rain out of your face. I wore gloves on one day when we endured 30-mph winds. A neck gaiter and a wool hat would have been welcome.
3. Footgear: Both taiga ("small trees") and tundra can hold moisture, so I wore waterproof boots with lug soles, useful on muddy and occasionally steep trails. Bring more than enough wool socks: few things feel better after a day outdoors than putting on a pair of clean socks. We wore our boots on the plane to save space, but it's a good idea to have another comfortable pair to change into. A hiking stick gives you extra stability (if you break it down into separate sections, it may fit into your carry-on luggage).
4. Getting Around: We rented a car for the first portion of our trip. A GPS was available, but we took ours with us from home. The one day we didn't bother taking it on a trip to Eagle River in Chugach State Park was the day we had to stop and ask for directions.
You can travel to Denali by train or by bus. We took the train there and the bus back. The bus is faster and comfortable, with a few scenic stops along the way; the train is, well, a train: either you like them or you don't. There's an observation car for free--you are asked to limit your time there to 40 minutes--or you can pay more for a seat in another observation car. We were happy with the less expensive option.
5. When not in the wild: Be sure to visit museums and other centers. In Seward, for example, the Alaska SeaLife Center is spectacular (and great for kids as well). In Anchorage, we learned an enormous amount from going through the Alaska Native Heritage Center and the spectacular Anchorage Museum.
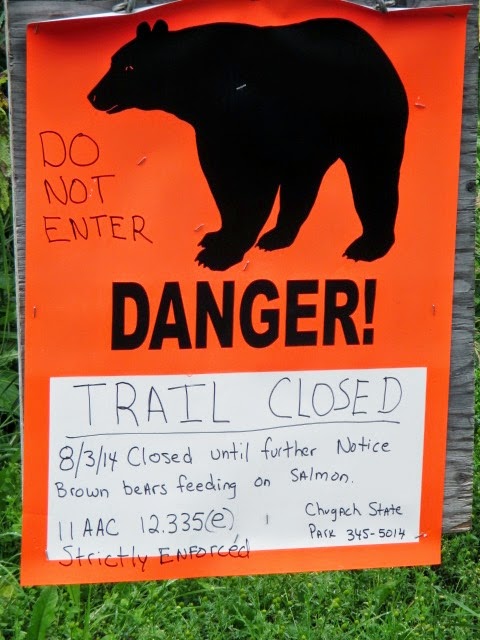
7. Safety. An obvious concluding suggestion: don't mess with the wildlife. On our hike along Eagle River, we came upon this sign:


1. Timing: Late August-early September is a good time to visit: few or no bugs, the aspen is turning gold, and the fall colors on the tundra are spectacular. It's cool-to-cold at night, though, which leads to 2.
2. Clothing: We stayed south of the Arctic Circle, and temperatures during the day were mostly in the 60's with some rain. Bring layers of clothing, therefore, along with a day pack to carry them and a water bottle (you can't drink the water). I wore long underwear nearly every day plus fleece, topped on occasion with rain gear. A baseball cap is useful under a hood to keep rain out of your face. I wore gloves on one day when we endured 30-mph winds. A neck gaiter and a wool hat would have been welcome.
3. Footgear: Both taiga ("small trees") and tundra can hold moisture, so I wore waterproof boots with lug soles, useful on muddy and occasionally steep trails. Bring more than enough wool socks: few things feel better after a day outdoors than putting on a pair of clean socks. We wore our boots on the plane to save space, but it's a good idea to have another comfortable pair to change into. A hiking stick gives you extra stability (if you break it down into separate sections, it may fit into your carry-on luggage).
4. Getting Around: We rented a car for the first portion of our trip. A GPS was available, but we took ours with us from home. The one day we didn't bother taking it on a trip to Eagle River in Chugach State Park was the day we had to stop and ask for directions.
You can travel to Denali by train or by bus. We took the train there and the bus back. The bus is faster and comfortable, with a few scenic stops along the way; the train is, well, a train: either you like them or you don't. There's an observation car for free--you are asked to limit your time there to 40 minutes--or you can pay more for a seat in another observation car. We were happy with the less expensive option.
5. When not in the wild: Be sure to visit museums and other centers. In Seward, for example, the Alaska SeaLife Center is spectacular (and great for kids as well). In Anchorage, we learned an enormous amount from going through the Alaska Native Heritage Center and the spectacular Anchorage Museum.
7. Safety. An obvious concluding suggestion: don't mess with the wildlife. On our hike along Eagle River, we came upon this sign:
A few days later, watching from the safety of our Road Scholars' bus, we saw a sow grizzly lope up a mountainside to guard her two cubs from a large boar grizzly. I had two reactions: first, these are big, powerful bears; second, surprising one might well be hazardous to your health. Ditto a cow moose with her calf, and so on. A little humility about the powerlessness of our own species is a good thing to learn, I realized.
Here are a few photos from our point-and-shoot camera.
Turnagain Arm south of Anchorage; it has the greatest tidal flows of anywhere in North America except the Bay of Fundy:
The terminus of Exit Glacier:
A bull caribou feeding in Denali:
A windy, cold day on Savage River in Denali (I'm wearing gloves and wishing I'd brought a neck gaiter and a wool hat):
Caroline and I on a rainy day hiking the Three Lakes trail in Denali. Some ten-mile trails are longer than others, and in the sporadic rain this was one of the longer ones I've ever hiked. Riley Creek is in the background.
Finally, the Great One, as "Denali" translates into English, viewed from the north. I took this shot in the morning, showing the tundra here is in its fall color, succeeded by rock and then by Denali's everlasting snow:
Sunday, August 17, 2014
Blood on My Hands is now available!
To continue with this shameless self-promotion, my book is now available from Amazon in hardcover and paperback editions; an e-book should be out the last week of August. As the title could be understood to refer to murder or zombies or something, I was advised to have a longer, more explicit subtitle. The complete title therefore is:
Blood on My Hands: How Hunting Led Me to Question Our
Relationship to Animals, Discover that DNA Unites Us All, and Realize that We
Have to Expand Our Understanding of Ecology and Take Responsibility for the
Earth
I've deliberately written for non-hunters as well as hunters. If I can't quite bring myself to describe it as a stunning work of staggering genius, that's because I was raised to be modest. Judge for yourself (grin).
Here's the link to Amazon:
Saturday, August 16, 2014
Remodeling a BRNO Mauser Sporter, Part 2
I suspect I'm a wood butcher at heart, because one of the aspects I love most about messing around with rifles is hacking away on their stocks, trying to realize my ideal of the entirely personal, elegantly functional tool. In fact, a friend once remarked to me, "Given that you like to work on stocks so much, Gerry, why don't you save money and just buy stocks instead of the entire gun?"
From one point of view, remodeling a rifle stock is like making a statue out of a block of marble: you just cut away everything that doesn't belong there. That's all well and good, but how do you know when you've gone far enough? My best answer now is, If you aren't terrified that you've cut too much away, you haven't gone far enough.
So here's the beginning of the surgery on the BRNO sporter:

 Line D above shows this relation between the flat of the grip and the heel of the butt (English stockers often decrease that angle, making Line D touch the comb a bit forward of the heel).


From one point of view, remodeling a rifle stock is like making a statue out of a block of marble: you just cut away everything that doesn't belong there. That's all well and good, but how do you know when you've gone far enough? My best answer now is, If you aren't terrified that you've cut too much away, you haven't gone far enough.
So here's the beginning of the surgery on the BRNO sporter:
Using first a bandsaw and then a plane, I cut away nearly all of the Monte Carlo comb; you can see a slight drop still remaining behind the cheekpiece. I'll switch to a block plane for the last bit. Eventually, I will be able to lay a straightedge on the comb and have all of it be in the same plane.
The white lines indicate the other alterations I plan to make. I'll thin the cheekpiece and add a shadow line, outlined now in white, while changing its contour slightly as it nears the grip.
As for the grip, it's getting surgery on its bottom and top lines. The surgery on the bottom line of the grip consists of cutting back its fullness. The new line will come back almost as far as the present screw hole for the grip cap. I'll also fit a much smaller grip cap, altering at the same time its angle so that a ruler laid on its flat will touch the heel of the butt. This is hard to describe, so here's an illustration from David L. Wesbrook's useful Professional Stockmaking (1994):
I need to add one inch to the length of pull, so I'll add a new pad after I have finished with the comb. As the distance from the rear of the bolt to the nose of the comb feels a bit cramped to me, I will also cut back the nose of the comb by 1/4" or so. Classically, the nose of the comb should be centered on the middle of the grip cap, as in Line E above, but I'll happily break that rule if I need more room for my right hand.
After beavering away, here are two photos of the work in progress. I've reattached the grip cap so you can see how much I've cut away to open up the bottom line of the grip:
I've also started to reduce the thickness of the cheekpiece. The nose of the comb is now back 1/4", but it still doesn't give me enough room. I'll cut it back farther, which should also align it with the center of the flat on the grip. The stock is well on its way to its new, classical appearance:
This sporter, like many Mausers, has a trough cut in the top of the grip from the bolt being retracted and chipping out the wood. This trough can be eliminated and the upper grip line much improved by filing the wood and metal together at the top of the grip. I'll show this in another post.
The final remodeling of the grip will consist of making it oval by slimming it down equally on both sides. A little off here and a little off there will make an enormous difference: stay tuned!
Monday, August 11, 2014
Remodeling a BRNO Mauser Sporter, Part 1
For most of the 20th Century, the cheapest way to acquire a hunting rifle was to purchase a military surplus one and remodel it. The US Government obligingly made available Krag-Jorgensens in .30-40 and later 1903 Springfields and 1917 Enfields in .30-06, while after WW II all kinds of military rifles were imported by commercial enterprises and sold as surplus.
Surplus rifles are still available, of course, but unless you're content to sporterize the military stock and to hunt with military sights, you're monetarily ahead today buying a commercial rifle. Why? Because by the time you add up the costs of a new stock, a new barrel, altering the bolt so it will clear a scope, adding iron sights or drilling and tapping for a scope, you're well into what a new sporter costs--even if you can do some of this conversion work yourself.
So why did I just purchase a converted BRNO (pronounced "Bear'-no") Mauser in 7x57mm?

BRNO (now CZ) exported 7x57's to many countries in Latin and South America. Thanks to Robert W.D. Ball's Mauser Military Rifles of the World, 3rd. ed., we can tell from the crest on the receiver with its quetzal bird that this rifle was one of the 4,000 BRNO exported to Guatemala in 1937.

Fair enough, but why was this rifle's price relatively low? I suspect that there were two reasons: first, whoever priced it didn't know that BRNO's are reputed to be among the very best of the Mauser actions. In The Mauser M91 Through M98 Bolt Actions: A Shop Manual, for example, Jerry Kuhnhausen rates the BRNO's as "highly desirable for building custom rifles" (p. 215).
The second reason for this rifle's low price, I'd guess, is that the style of its stock is no longer in fashion.

The stock is actually a fairly conservative version of what's often called the California style of the 60's and 70's: there's a white spacer in the recoil pad, but not one in the grip cap, while the fore end, although angular, does not end with an exotic tropical wood tip cut at some angle more acute than 90 degrees.
As John Barsness has pointed out, a Monte Carlo stock like this can potentially fit quite well someone with a long neck and sloping shoulders. For bettor or worse, I'm built differently, and I much prefer the lines of the so-called classic stock.
Fortunately, it's easy to decide whether remodeling this kind of stock will work out. My first concern is with the comb. Will it be high enough to use a scope if I eliminate the Monte Carlo comb, or will the comb then become so low that only iron sights will give me a good cheek weld? I first put a straightedge from the nose of the comb to the top of the butt, trying to imagine how it will look.

If that checks out, I look at the underline of the butt. Ideally, a straightedge placed along the underline and extended through the grip should come pretty close to the screw at the rear of the trigger guard. If it does, I then take a close look at the size and shape of the pistol grip. The one on this rifle is a large, full one. I like a more open grip, and the fullness here will let me cut it back a bit and thereby open it up, which I prefer for a quick offhand shot.
Finally, I evaluate the length of the fore end in relation to the length of the barrel. Just as different people will disagree on color, so too on the ideal proportions for a sporter. Here, to my eye, the fore end is too long, making the barrel look short. I was concerned enough in the store to measure the barrel. It is actually 21 1/2" long, so the fore end could be cut back to look more in proportion. If I keep a sling swivel stud in the fore end, that will have to be a bit longer; if I put on a barrel band swivel stud, I can cut the fore end shorter and thereby make the barrel look a bit longer.
Having purchased the rifle, I have some remodeling decisions to make: in addition to the barrel band vs. swivel stud on for the fore end, I need to decide whether I want to retain the military trigger. I'll also have to order a new pad and perhaps a grip cap. All these topics provide wonderful topics for delightful and obsessive thought. In subsequent posts, I'll report on what I decide and how the remodeling is progressing. And if anyone has questions or suggestions, I'd like to hear them.
Surplus rifles are still available, of course, but unless you're content to sporterize the military stock and to hunt with military sights, you're monetarily ahead today buying a commercial rifle. Why? Because by the time you add up the costs of a new stock, a new barrel, altering the bolt so it will clear a scope, adding iron sights or drilling and tapping for a scope, you're well into what a new sporter costs--even if you can do some of this conversion work yourself.
So why did I just purchase a converted BRNO (pronounced "Bear'-no") Mauser in 7x57mm?
BRNO (now CZ) exported 7x57's to many countries in Latin and South America. Thanks to Robert W.D. Ball's Mauser Military Rifles of the World, 3rd. ed., we can tell from the crest on the receiver with its quetzal bird that this rifle was one of the 4,000 BRNO exported to Guatemala in 1937.
Why was this between-the-wars Mauser a good buy? Because someone else had converted the military BRNO into a sporter and had therefore already incurred most of those expenses--and their cost wasn't reflected in the asking price! This rifle still retains its military two-stage trigger and bottom metal, but it wears either a turned down and blued military barrel or a civilian barrel in 7x57, the bolt handle has been replaced, a Buehler safety installed, and the action drilled and tapped both for a peep sight with a ramped front sight and for Weaver bases.
Fair enough, but why was this rifle's price relatively low? I suspect that there were two reasons: first, whoever priced it didn't know that BRNO's are reputed to be among the very best of the Mauser actions. In The Mauser M91 Through M98 Bolt Actions: A Shop Manual, for example, Jerry Kuhnhausen rates the BRNO's as "highly desirable for building custom rifles" (p. 215).
The second reason for this rifle's low price, I'd guess, is that the style of its stock is no longer in fashion.
The stock is actually a fairly conservative version of what's often called the California style of the 60's and 70's: there's a white spacer in the recoil pad, but not one in the grip cap, while the fore end, although angular, does not end with an exotic tropical wood tip cut at some angle more acute than 90 degrees.
As John Barsness has pointed out, a Monte Carlo stock like this can potentially fit quite well someone with a long neck and sloping shoulders. For bettor or worse, I'm built differently, and I much prefer the lines of the so-called classic stock.
Fortunately, it's easy to decide whether remodeling this kind of stock will work out. My first concern is with the comb. Will it be high enough to use a scope if I eliminate the Monte Carlo comb, or will the comb then become so low that only iron sights will give me a good cheek weld? I first put a straightedge from the nose of the comb to the top of the butt, trying to imagine how it will look.
I also retract the bolt as in the picture above, and check how close the bolt is to the comb at the nose. For using a scope, I want the bolt to barely clear the nose; for iron sights--with my aging eyes, I prefer aperture sights--there can be some distance between the bolt and comb, as here.
If that checks out, I look at the underline of the butt. Ideally, a straightedge placed along the underline and extended through the grip should come pretty close to the screw at the rear of the trigger guard. If it does, I then take a close look at the size and shape of the pistol grip. The one on this rifle is a large, full one. I like a more open grip, and the fullness here will let me cut it back a bit and thereby open it up, which I prefer for a quick offhand shot.
Finally, I evaluate the length of the fore end in relation to the length of the barrel. Just as different people will disagree on color, so too on the ideal proportions for a sporter. Here, to my eye, the fore end is too long, making the barrel look short. I was concerned enough in the store to measure the barrel. It is actually 21 1/2" long, so the fore end could be cut back to look more in proportion. If I keep a sling swivel stud in the fore end, that will have to be a bit longer; if I put on a barrel band swivel stud, I can cut the fore end shorter and thereby make the barrel look a bit longer.
Having purchased the rifle, I have some remodeling decisions to make: in addition to the barrel band vs. swivel stud on for the fore end, I need to decide whether I want to retain the military trigger. I'll also have to order a new pad and perhaps a grip cap. All these topics provide wonderful topics for delightful and obsessive thought. In subsequent posts, I'll report on what I decide and how the remodeling is progressing. And if anyone has questions or suggestions, I'd like to hear them.
Subscribe to:
Posts (Atom)