Hits and Misses

Hits and Misses

Saturday, October 11, 2014

Remodeling a BRNO Mauser sporter, Part 5

Epoxy bedding is straightforward enough, but the devil lies in the details. There are a number of explanations about how to do this: three I especially like are "Simple Stock Bedding" by John Barsness in his Obsessions of a Rifle Loony (Deep Creek Press, 2010), a book every firearms enthusiast should own, Patrick Sweeney's "Glass Bedding" in  his excellent Gunsmithing Rifles (Krause Publications, 1999), and "The Experience of Glass Bedding a Rifle Stock" by Bryce Towsley in his  Gunsmithing Made Easy (Stoeger Publishing, 2006), which has detailed photographs.

The key point to remember is that if you don't apply release agent to every part that needs it, you can glue the stock to the barreled action. Some people like to use floor or furniture wax as a release agent.  I prefer some combination of three release agents: Brownell's Acra-Release Aerosol; modeling clay to fill screw holes and crevices where you don't want epoxy; and Pasco PVC 10 mil Pipe Wrap for masking off the barrel.

I use Brownell's Acraglas Gel rather than Acraglas, as it pretty much stays put where you apply it.

Some other suggestions:  Score or crosshatch the wood with a sharp knife or chisel so the epoxy adheres.

Don't forget to put release agent on the action screws, as well.  Forster stockmaker's handscrews are useful here.

Q-tips are good place holders for the receiver screws on a bolt action.  For Mausers, which have the front screw going into the recoil lug, you can put a Q-tip in the recoil lug, lower the receiver into the epoxy on the stock, and then pull the Q-tip out of the bottom metal.

To facilitate getting the barreled action out of the stock, you don't want epoxy in front of the recoil lug, so put release agent on the front of the lug.

I follow the practice recommended by John Barsness for bedding Mausers, which have a narrow recoil lug:  I bed the first inch of the barrel as well, so I keep the Pipe Wrap off the first inch of the barrel and spray receiver and that inch of barrel with release aerosol (twice).

If you need to fill gaps along the receiver or the barrel in the fore end, put masking tape along the top of the stock so you can peel it off after it cures.

Tighten the screws only moderately:  I tighten them and then back them off half a turn. 

Check the epoxy after five hours.  After five hours, the epoxy has set up enough to be semi-solid, but it's yielding enough to be pulled apart if you've made a mistake.  If some has gone where it shouldn't, you can still cut it easily with a knife or chisel and remove it.  Then screw it back together, back off the screws a half turn, and let it set.

To remove the barreled action from the stock, turn the rifle upside down and tap the heel of the butt on a surface that won't harm the stock.  You should then be able to remove the barreled action.  Repeat, more firmly, as necessary.  If it  still won't budge, back out the screws until they are just engaged and hit them with a mallet.  If that doesn't work, call Brownell's (641 623-5401).

You may discover some voids in the bedding.  Here, for example, is the BRNO after the first bedding:
 
Some gaps in the bedding are obvious.  Not to worry:  just mix up some more epoxy and fill in the gaps.  Wipe down the metal and reapply release agent, etc.

Here's how it looked after another application:


A tiny bit has to be added to smooth out the bedding for the barrel, but it's functionally complete.
 
The next in this series will cover finishing the stock.


Monday, October 6, 2014

Remodeling a BRNO Mauser Sporter, Part 4

Now comes the patient, painstaking part:  the drama of cutting off big chunks of wood is over.  At this point, it helps to make a check list for the sequence you need to follow.  For example, I am going to add a barrel band for a sling swivel, so I don't want to attach the front sight before I do that.  (You ask, why do I mention something so obvious?  Never mind!)

To make matters even less dramatic, much of the work that needs to be done will not be visible, as in floating the barrel or supporting the recoil lug with epoxy.  I can promise, however, that following all these steps does eventually result in a real sense of satisfaction and, sometimes, a year or so later, a sense of wonder:  "I did that?  It looks pretty good!"

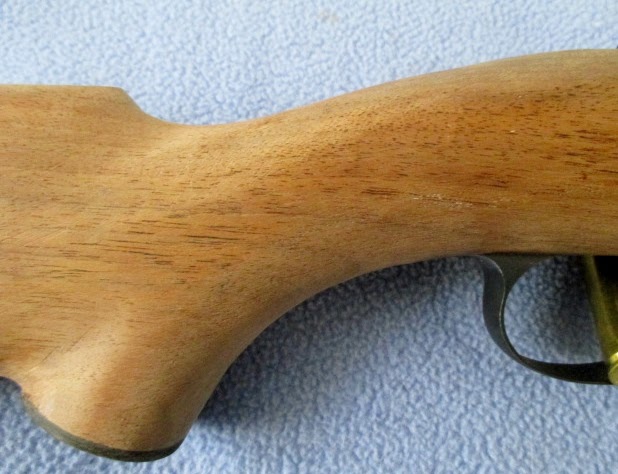
For now, let's begin with the two tasks I mentioned in my last post:  filing down the tang of the receiver and rounding the squared-off fore end.  Each one affects how the rifle will look.  Here's a picture of the Mauser tang in a military stock:


Notice the wood chipped out behind the tang?  That's why you don't want to copy this configuration  in a Mauser sporter:  working the bolt will chip out some wood.  The solution is simple:  just file metal and wood together until the rear of the channel barely protrudes above the tang and stock.  Here's how the BRNO came out (later, I'll cold blue the tang):

 
Not only will you not have a problem with wood chipping out, but you will gain a better line for the top of the pistol grip.  Now its slope looks less like a ski jump:  the top line is more gradual and more graceful:


You have two choices in regard to the squared-off fore end.  One is to add an ebony tip; the other is simply to round it off.  I like ebony tips, but this barrel is only 21 1/2" long, so space is tight. To have the fore end in proportion to the length of the barrel, I need to have a barrel band for the sling swivel.  That in itself doesn't preclude an ebony tip, but I have long arms (a 35" sleeve), so my forward hand will have to be very close to the end of the stock.  Given that I want some checkering where my hand goes, there simply isn't room for a fore end tip. 

So, no fore end tip.  That's OK:  As the great stock maker Alvin Linden commented, fore end tips don't do anything!  For a classic look, the tip of the fore end should be rounded.  Here, it helps to have the depth of the fore end pretty close to its width.  One method of making it round is shown on Midway's video.  I just eyeball it and take my time.  If it seems off, just measure the depth (or width), divide that in two for a radius, and then scribe half a circle on a piece of paper, cut it out, and hold it against the wood.  It will be immediately obvious where it's off.  Restrain yourself from making it perfect, for fine sanding will come later, and that can easily distort curves and, especially, complex curves.


In the next post, I'll talk about epoxy bedding the action.  Whoever inlet this rifle did an excellent job, apparently using a very small gouge.  But the epoxy, carefully applied, will produce an even better job where it counts most, around the recoil lug.

Saturday, October 4, 2014

Moose + Car Photo

Having driven through Moose Pass twice in our trip to Alaska and, in addition, having seen many, many yellow highway signs warning drivers to watch out for moose, I was impressed by this photo included in the current newsletter of Cornell Publications (not to be confused with the university or college by that name, but a catalog reprinting business owned by Rob and Abby Mouat: http://www.cornellpubs.com/.  They provide a wonderful service at a very reasonable cost). 

A moose has such long legs that when it's hit by a car, the body comes through the windshield, typically killing the driver.  In this case, the driver was apparently born under a lucky star.

The lady driving the car apparently walked away with minor injuries!
Moose-Car Accident
thanks to Dick Carleton

Tuesday, September 30, 2014

Ted Kerasote's Pukka's Promise

In Pukka's Promise:  The Quest for Longer-Lived Dogs (Houghton Mifflin Harcourt, 2013), Ted Kerasote provides a far-ranging investigation of what we know about canine breeding, nutrition, vaccination, sterilization, and life span.  Woven through this hefty book of 452 pages are accounts of his finding a Lab puppy which he names Pukka (pronounced Puck'a, from the Hindi for First Class) and the methods he used to train him as the other member of his household.

Anyone with a dog or contemplating getting a dog will find much of interest here.  Kerasote explodes the practice of annual vaccinations, provides alarming information about feeding kibble, and reveals that vets continue to spay and neuter--instead of doing tubal ligations and vasectomies--because those are the operations they were taught to do in vet school.  And he obligingly provides notes so that his readers can follow up and come to their own conclusions.

The one drawback to this informative book concerns Kerasote's conversations with Pukka.  Show me someone who doesn't talk to her or his dog, and I'll show you a dreary person indeed.  The problem is that Kerasote also supplies Pukka's half of the conversations, and I find this truly cringe-inducing.  Given that one side of these verbal exchanges is fictional, the old advice for fiction writers remains valid here:  show, don't tell.

That aside, Ted Kerasote's Pukka's Promise is well researched, engagingly written, and thought-provoking.


Wednesday, September 24, 2014

Blood on My Hands now available on Kindle

I'm happy to announce that Blood on My Hands is now out as an e-book.  The price of the Kindle edition on Amazon is $9.99.  (If anyone knows why it takes so long to produce an electronic text from a printed one, I'd like to hear about it.)

Friday, September 19, 2014

Remodeling a BRNO Mauser Sporter, Part 3

When I wasn't staggering through the taiga or the tundra in our recent trip to Alaska, I found myself happily contemplating how this remodeled BRNO sporter in 7x57mm should look.  I wasn't sure that removing the last vestige of the Monte Carlo comb was going to leave me with enough comb height to use a scope, so I decided to make a defect a virtue and set up the rifle with a Lyman peep sight (it was already drilled and tapped for one).  I'd have to shop for another ramped front sight, one long enough to use or to hide the existing two blind screws.

I ordered a 1" red pad from Galazan, knowing from experience that it was easy to sand to fit.  I forgot, though, that it comes without screws (why, I don't know), but I managed to turn up two that would work.  Attaching the pad was relatively straightforward.  As the outer surface of the pad was not cut for the screws, I inserted them from the rear and pressed the pad with the inverted screws down on my bench.  With a sharp knife, I made two small slits where the points stressed the material.  Some Vaseline on the screws, and they entered the pad fairly easily.  I used the original hole for the top screw, but the lower one did not line up (it almost never does).  Not a problem:  I glued in my favorite tapered dowel, a chopstick, and then cut it flush when the glue had dried.  Then, after carefully positioning the pad on the stock, engaging the top screw, and inserting the bottom screw in its place, I tapped it to mark its position.  For this kind of drilling, I much prefer an eggbeater hand drill:  it's a bit slower, so I have more time to correct before something goes really wrong.

I worked down the pad to fit by using a hacksaw to saw off excess, then, carefully, a belt sander, and finished up with sandpaper on a block.  For reasons I'm not clear about, 220 grade cuts the pad more cleanly than 100 grade.

Once the pad was in place, I could adjust the angle of the grip cap.  I didn't need any more length for the pistol grip, so I set the bottom angle so that extending that line would hit the top of the recoil pad, as in the illustration I used in Part 2:


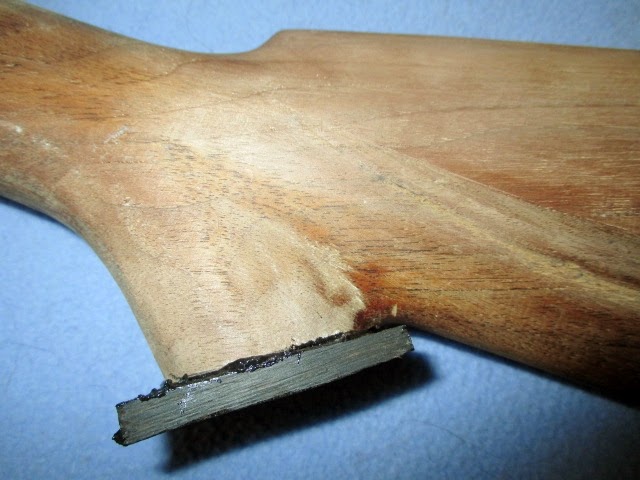
The band saw made the first cut, which I cleaned up with a chisel and block plane.  Creating the open grip I wanted had resulted in a rather small grip area, so I decided to make my own grip cap out of a scrap of ebony.  Mixing up black Acraglas, I epoxied it on.  Here it is before I began shaping:


Here's the shaped and rough-sanded ebony cap; I'll thin it a bit later:


Two other operations had to take place:  first, cutting the fore end to length; second, filling in the gap in front of the bottom metal, caused by substituting a FN commercial one I had on hand for the military one.  I like a miter box for cutting the fore end at ninety degrees, and I use tape on the underside to keep splintering to a minimum.

Here's a photo showing the differences in length between the military and commercial versions of the bottom metal.  Using the shorter one without guard screws of course leaves a gap in the inletting, so I patched it with a piece of the cut-off fore end.  The patch itself is completely obscured, what with the rubber band putting pressure on the patch in one dimension and the bar clamp putting pressure on it in another dimension; the other end of the bar clamp is on the now flat surface of the fore end.


Here's the patch cut flush after inletting the commercial bottom metal; the brown line of epoxy will be less visible after dying the wood which is, after all, from the same blank and thus matches as well as possible:


The next post will deal with several bits of metal work:  slimming down the top tang of the action for a better top line of the grip, and rounding the fore end tip.
 
 
Afterword (10/12/2014):  Although I wasn't sure that removing the Monte Carlo comb was going to leave a comb high enough to use a scope, it has turned out to be fine for a scope mounted low.  As my immediate use for this rifle will be for whitetails in heavy cover, I'm going to proceed by using a peep sight together with a ramped Lyman front sight (the latter just purchased inexpensively from e-Bay.)


Sunday, September 7, 2014

North to Alaska, and Back

My bride Caroline and I have just returned from our first trip to Alaska.  It's a big--no, huge--state:  Alaskans are fond of saying that if the state were split in two, each half would still be bigger than Texas.  We experienced only a tiny portion of it, flying to Anchorage, driving a rental car down to Seward and back, and then hiking for a week in Denali National Park, but we had a wonderful time and learned a few things I thought I'd pass along to others thinking about such a trip.

1.  Timing:  Late August-early September is a good time to visit:  few or no bugs, the aspen is turning gold, and the fall colors on the tundra are spectacular.  It's cool-to-cold at night, though, which leads to 2.

2.  Clothing:  We stayed south of the Arctic Circle, and temperatures during the day were mostly in the 60's with some rain.  Bring layers of clothing, therefore, along with a day pack to carry them and a water bottle (you can't drink the water).  I wore long underwear nearly every day plus fleece, topped on occasion with rain gear.  A baseball cap is useful under a hood to keep rain out of your face.  I wore gloves on one day when we endured 30-mph winds.  A neck gaiter and a wool hat would have been welcome.

3.  Footgear:  Both taiga ("small trees") and tundra can hold moisture, so I wore waterproof boots with lug soles, useful on muddy and occasionally steep trails.  Bring more than enough wool socks:  few things feel better after a day outdoors than putting on a pair of clean socks.  We wore our boots on the plane to save space, but it's a good idea to have another comfortable pair to change into. A hiking stick gives you extra stability (if you break it down into separate sections, it may fit into your carry-on luggage).

4.  Getting Around:  We rented a car for the first portion of our trip.  A GPS was available, but we took ours with us from home.  The one day we didn't bother taking it on a trip to Eagle River in Chugach State Park was the day we had to stop and ask for directions.

You can travel to Denali by train or by bus.  We took the train there and the bus back.  The bus is faster and comfortable, with a few scenic stops along the way; the train is, well, a train:  either you like them or you don't.  There's an observation car for free--you are asked to limit your time there to 40 minutes--or you can pay more for a seat in another observation car.  We were happy with the less expensive option.

5.  When not in the wild:  Be sure to visit museums and other centers.  In Seward, for example, the Alaska SeaLife Center is spectacular (and great for kids as well).  In Anchorage, we learned an enormous amount from going through the Alaska Native Heritage Center and the spectacular Anchorage Museum.

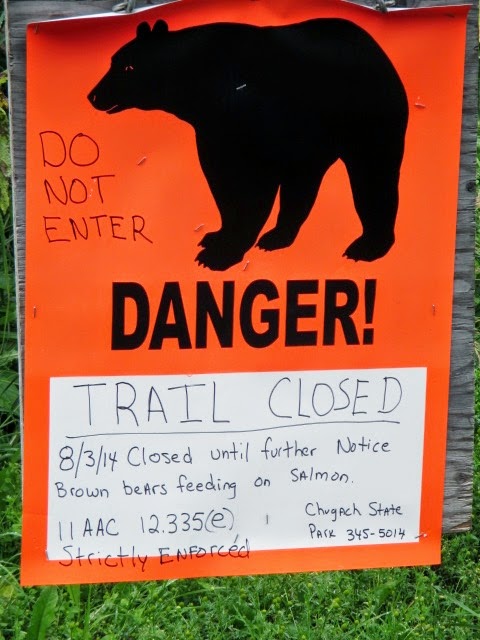
7.  Safety.  An obvious concluding suggestion:  don't mess with the wildlife.  On our hike along Eagle River, we came upon this sign:

 
A few days later, watching from the safety of our Road Scholars' bus, we saw a sow grizzly lope up a mountainside to guard her two cubs from a large boar grizzly.  I had two reactions:  first, these are big, powerful bears;  second, surprising one might well be hazardous to your health.  Ditto a cow moose with her calf, and so on.  A little humility about the powerlessness of our own species is a good thing to learn, I realized.
 
Here are a few photos from our point-and-shoot camera.
 
Turnagain Arm south of Anchorage; it has the greatest tidal flows of anywhere in North America except the Bay of Fundy:

 
The terminus of Exit Glacier:


A bull caribou feeding in Denali:


A windy, cold day on Savage River in Denali (I'm wearing gloves and wishing I'd brought a neck gaiter and a wool hat):


Caroline and I on a rainy day hiking the Three Lakes trail in Denali.  Some ten-mile trails are longer than others, and in the sporadic rain this was one of the longer ones I've ever hiked.  Riley Creek is in the background.


Finally, the Great One, as "Denali" translates into English, viewed from the north.  I took this shot in the morning, showing the tundra here is in its fall color, succeeded by rock and then by Denali's everlasting snow: